👈
🧭 COMPLETE AWS EC2 HANDS-ON ROADMAP
🧪 EC2 HANDS-ON – LAB 1
👉 Launch Your First EC2 Instance (Free Tier – SAFE)
🎯 Objective
You will:
- Launch a Free Tier EC2 instance
- Understand AMI, instance type, key pair, security group
- Get a public IP
🧠 Before You Start (Very Important)
- Login to Amazon Web Services Management Console
- Make sure you are in ONE region (example:
ap-south-1 (Mumbai))
👉 Region matters because:
- EC2 runs inside a region
- Free tier limits are per region
🔹 STEP 1: Go to EC2 Dashboard
- Login to AWS Console
- In the search bar, type:
EC2 - Click EC2
📌 You are now inside the EC2 service
🔹 STEP 2: Click “Launch Instance”
- Click Launch Instance
- You will see a Launch Instance page
🔹 STEP 3: Name Your Instance
-
Instance name:
ec2-hands-on-1
📌 This is just a label to identify your server
🔹 STEP 4: Choose AMI (Operating System)
Select:
- Amazon Linux 2023 AMI
📌 Why?
- Free tier eligible
- Optimized for AWS
- Secure and lightweight
✅ Do NOT choose Ubuntu for now
🔹 STEP 5: Choose Instance Type
Select:
- t2.micro
📌 Why?
- 1 vCPU
- 1 GB RAM
- FREE TIER ELIGIBLE
⚠️ Anything else = billing risk
🔹 STEP 6: Create Key Pair (VERY IMPORTANT)
Key pair = login password for your server
-
Click Create new key pair
-
Key pair name:
ec2-key-hands-on -
Key pair type: RSA
-
Private key format: .pem
-
Click Create key pair
📌 A .pem file will download
⚠️ DO NOT DELETE IT
Without this, you cannot login
🔹 STEP 7: Configure Network Settings (Security Group)
Click Edit under Network settings
Inbound rules (ALLOW ACCESS):
| Type | Port | Source |
|---|---|---|
| SSH | 22 | My IP |
| HTTP | 80 | Anywhere |
📌 Explanation:
- SSH (22) → Login to EC2
- HTTP (80) → Web server access
- My IP → Secure (only your system)
- Anywhere → Public website access
🔹 STEP 8: Storage (Leave Default)
- 8 GiB (gp3) → Leave as it is
📌 Free tier allows up to 30 GB
🔹 STEP 9: Launch Instance
- Review everything
- Click Launch Instance
- Click View all instances
🔹 STEP 10: Verify Instance Status
Your instance state should be:
- 🟡 Initializing
- 🟢 Running
Click your instance and check:
- Instance State → Running
- Public IPv4 address → COPY IT
📌 This IP is your server on the internet
✅ TASK FOR YOU (DO THIS NOW)
✔ Launch EC2 instance ✔ Instance state = Running ✔ You can see Public IPv4 address
Excellent 👍 LAB 1 completed successfully ✅ Now we move to the next hands-on, exactly as promised.
🧪 EC2 HANDS-ON – LAB 2
👉 Connect to EC2 using SSH
🎯 Objective of This Lab
You will:
- Connect to your EC2 instance from your Windows laptop
- Understand SSH, key pair, user, IP
- Login successfully without fear or confusion
🧠 Important Concepts
Before doing steps, understand this:
🔹 What is SSH?
SSH (Secure Shell) is a secure way to:
- Connect your laptop → EC2 server
- Run commands on the server
Think like this:
SSH = Remote control of your EC2 using text commands
🔹 What do we need for SSH?
We need 4 things:
- Public IP → Address of your EC2
- Key pair (.pem file) → Password (but more secure)
- Username → Depends on OS
- SSH command
🔹 STEP 1: Open PowerShell (Windows)
- Press Windows key
- Type:
PowerShell - Open Windows PowerShell
📌 Do NOT open CMD PowerShell supports SSH by default
🔹 STEP 2: Go to Folder Where .pem File Exists
Your key file name:
ec2-key-hands-on.pem
Usually it is in Downloads folder.
Run this command:
cd Downloads
📌 Explanation:
cd= change directoryDownloads= folder name
To confirm file exists, run:
ls
📌 ls shows list of files
You should see:
ec2-key-hands-on.pem
🔹 STEP 3: Copy Your EC2 Public IP
- Go to EC2 Console
- Click your instance
- Copy Public IPv4 address
Example:
13.235.xxx.xxx
🔹 STEP 4: Understand the SSH Command (IMPORTANT)
SSH command format:
ssh -i keyfile.pem username@public-ip
Now replace values 👇
| Part | Value |
|---|---|
| keyfile | ec2-key-hands-on.pem |
| username | ec2-user |
| public-ip | your EC2 IP |
📌 Why ec2-user?
Because you selected Amazon Linux AMI
🔹 STEP 5: Connect to EC2 (RUN THIS)
ssh -i ec2-key-hands-on.pem ec2-user@YOUR_PUBLIC_IP
Example:
ssh -i ec2-key-hands-on.pem ec2-user@13.235.xxx.xxx
🔹 STEP 6: Type “yes” (First Time Only)
You will see:
Are you sure you want to continue connecting (yes/no)?
Type:
yes
Press Enter
📌 This happens only once It means: “I trust this server”
🎉 SUCCESS CHECK (VERY IMPORTANT)
If you see something like:
[ec2-user@ip-172-31-xx-xx ~]$
✅ YOU ARE INSIDE EC2 SERVER
This means:
- Your laptop → connected to AWS server
- SSH is working
- Key pair is correct
🔍 Verify You Are Really Inside EC2
Run:
whoami
Output should be:
ec2-user
Run:
pwd
Output:
/home/ec2-user
✅ TASK FOR YOU (LAB 2)
✔ Open PowerShell
✔ SSH into EC2
✔ See [ec2-user@...]$ prompt
✔ Run whoami
🔑 What is a Key Pair in EC2?
A Key Pair is like a lock and key 🔐
- Public key → Stored inside the EC2 instance (AWS keeps it)
- Private key → Downloaded by you (file like
.pemor.ppk)
This key pair is used to log in securely to your EC2 instance.
👉 Without a key pair, you CANNOT login to EC2
🧭 When You Create a Key Pair – What Options You See
When you click Create new key pair, AWS shows 2 main options:

1️⃣ Key Pair Type
You will see two options:
🔹 RSA (Most common ✅)
- Old but very stable
- Supported everywhere
- Default choice
👉 Use this if you are a beginner
🔹 ED25519
- Newer & more secure
- Faster
- Not supported by some old systems
👉 Use this only if you clearly know you need it
✅ Recommended for you: RSA
2️⃣ Private Key File Format (MOST IMPORTANT)
This is where people get confused 👇
You will see two options:
🔹 .pem file (Linux / Mac / Git Bash)
Use this when:
-
EC2 OS is Amazon Linux / Ubuntu
-
You connect using:
- Git Bash
- MobaXterm
- Mac Terminal
- Linux Terminal
🔹 .ppk file (Windows – PuTTY)
Use this when:
- You use PuTTY on Windows
- You don’t want to convert
.pemto.ppk
Used directly in PuTTY → Auth → Private key file
🧠 Very Important Rule (Remember This)
| Your Tool | Choose This |
|---|---|
| Git Bash / MobaXterm | .pem |
| Mac / Linux Terminal | .pem |
| PuTTY (Windows) | .ppk |
👉 If confused → Always choose .pem
You can later convert .pem → .ppk, but not easily the other way.
❗ IMPORTANT WARNINGS (Real-life mistakes)
⚠️ Download key only ONCE
- AWS will never show it again
- If you lose it → You lose access
⚠️ Do NOT share your private key
- Anyone with this file can access your server
⚠️ Do NOT upload key to GitHub
- This is a serious security risk
🧠 Short Memory Trick
Linux server =
.pemPuTTY user =.ppk
🔐 What “Key Pair” Means Internally (Big Picture)
An EC2 key pair uses asymmetric encryption.
That means:
- 🔑 Public Key → stored on the EC2 server
- 🗝️ Private Key → stored ONLY with you
- They work together, not separately
Think of it like:
Public key = Lock Private key = Only key that can open that lock
🧠 Step-by-Step: What Happens Internally
When EC2 instance is launched:
- The public key is copied into the server file:
~/.ssh/authorized_keys
This file lives inside the EC2 instance.
👉 This file decides who is allowed to log in.
🟢 You try to connect (SSH)
You run:
ssh -i mykey.pem ec2-user@<public-ip>
What happens internally:
- You say: “Hey server, I want to login”
- Server says: “Prove you are authorized”
🟢 Server sends a challenge 🔒
The EC2 server:
- Creates a random encrypted message
- Encrypts it using the public key
- Sends it to your system
⚠️ Important:
- Only the matching private key can decrypt it
🟢 Step 5: Your private key responds 🔓
Your computer:
- Uses your private key
- Decrypts the message
- Sends the correct response back
🟢 Step 6: Server verifies and allows login ✅
Server checks:
- “Does this response match what I expected?”
If YES:
- Login allowed 🎉
If NO:
- ❌ Permission denied
🔄 Internal Flow (Very Simple)
You (Private Key)
        ↓
Decrypt challenge
        ↓
Send proof
        ↓
EC2 checks using Public Key
        ↓
Login allowed
🔐 Why Password Is NOT Used
EC2 does NOT use passwords by default because:
❌ Passwords can be:
- Brute-forced
- Stolen
- Guessed
✅ Keys are:
- Very long
- Mathematically linked
- Impossible to guess
🔥 What If Someone Gets Public Key?
Nothing happens.
✔️ Public key:
- Can be shared
- Is useless without private key
❌ Private key:
- MUST be protected
- Gives full access
🧨 What If You Lose the Private Key?
Internally:
- Server has the public key
- You don’t have the private key
- Authentication fails forever ❌
Result:
-
You cannot login
-
You must:
- Detach root volume
- Attach to another EC2
- Add a new public key manually
🧠 One-Line Summary (Interview Ready)
EC2 uses SSH key-based authentication where the public key is stored on the server and the private key proves the client’s identity without ever being sent over the network.
🧪 Real-World Analogy
- Public key → Lock on your house
- Private key → Actual key in your pocket
- SSH login → Trying to open the door
🧪 EC2 HANDS-ON – LAB 3
👉 Install Apache Web Server & Host Your First Website

🎯 Objective of This Lab
You will:
- Install Apache (httpd) on EC2
- Start the web server
- Host a simple web page
- Access it using browser + public IP
🧠 Important Concept (Simple Words)
🔹 What is Apache?
Apache (httpd) is a web server.
Meaning:
- It listens on port 80
- When someone opens your IP in browser
- Apache sends a web page
🔹 STEP 1: Update Your EC2 Server
Run this command:
sudo dnf update -y
📌 Explanation:
sudo→ run command as admin (root)dnf→ package manager (like Play Store)update→ update system packages-y→ auto-approve (no questions)
🔹 STEP 2: Install Apache (httpd)
Run:
sudo dnf install httpd -y
📌 Explanation:
install→ install softwarehttpd→ Apache web server package
🔹 STEP 3: Start Apache Server
sudo systemctl start httpd
📌 Explanation:
systemctl→ service managerstart→ start servicehttpd→ Apache service
🔹 STEP 4: Enable Apache on Boot (VERY IMPORTANT)
sudo systemctl enable httpd
📌 Why?
- If EC2 restarts
- Apache starts automatically
🔹 STEP 5: Check Apache Status
sudo systemctl status httpd
You should see:
Active: active (running)
Press:
q
to exit status screen
🔹 STEP 6: Test in Browser (BIG MOMENT 🎉)
- Copy your EC2 Public IP
- Open browser
- Paste:
http://YOUR_PUBLIC_IP
Expected Result:
🟢 Apache Test Page
✅ This means:
- EC2 is running
- Apache is working
- Security group allows HTTP (port 80)
🔹 STEP 7: Create Your Own Web Page
Apache default folder:
/var/www/html
Go to folder:
cd /var/www/html
🔹 STEP 8: Create HTML File
sudo nano index.html
📌 nano = simple text editor
Paste this:
<!DOCTYPE html>
<html>
<head>
  <title>My First EC2 Website</title>
</head>
<body>
  <h1>Hello from EC2 🚀</h1>
  <p>Apache Web Server is working!</p>
</body>
</html>
Save & Exit:
- Press CTRL + X
- Press Y
- Press Enter
🔹 STEP 9: Refresh Browser
Open again:
http://YOUR_PUBLIC_IP
🎉 You should see your own website
🛑 COMMON ISSUE CHECK
If page does not open:
- Check Security Group → HTTP (80) allowed
- Instance state = Running
- Apache status = active
✅ TASK FOR YOU (LAB 3)
✔ Apache installed ✔ Apache running ✔ Custom HTML page created ✔ Website opens using public IP
🧪 EC2 HANDS-ON – LAB 4
👉 Elastic IP (Static Public IP) – No More IP Changes

🎯 Objective of This Lab
You will:
- Understand why public IP changes
- Create an Elastic IP (EIP)
- Attach it to your EC2 instance
- Access your website using a fixed IP
🧠 Why Public IP Changes? (Simple Explanation)
Because the public IP is temporary unless you reserve it.
-
AWS gives you a temporary public IP by default.
-
When the instance stops and restarts, that IP is taken back by AWS.
❌ Bad for:
- Websites
- APIs
- Domain mapping
🚨 IMPORTANT RULE (Remember This)
|Action | Public IP| |--- |---| |Reboot EC2 | ❌ Does NOT change| |Stop EC2 | ✅ Changes| |Terminate EC2 | ❌ Instance gone| |Start EC2 | ✅ New IP|
💰 Cost: 👉 ~$0.005 per hour per Elastic IP
🧠 What is Elastic IP?
Elastic IP (EIP) is:
- A static public IPv4 address
- Belongs to your AWS account
- You can attach/detach to EC2
Think like:
Elastic IP = Permanent phone number 📱 Public IP = Temporary number
⚠️ Cost Warning (IMPORTANT)
-
Free when attached to running EC2
-
Charged if:
- Not attached
- Instance stopped
👉 We will keep it attached
🔹 STEP 1: Go to Elastic IPs
- Open EC2 Console
- Left menu → Elastic IPs
- Click Allocate Elastic IP address
🔹 STEP 2: Allocate Elastic IP
- Network border group → Leave default
- Click Allocate
You will now see a new Elastic IP
🔹 STEP 3: Associate Elastic IP to EC2
- Select Elastic IP
- Click Actions → Associate Elastic IP
- Resource type → Instance
- Instance → select
ec2-hands-on-1 - Click Associate
🔹 STEP 4: Verify Association
-
Elastic IP shows:
- Instance ID
- Private IP
Your EC2 now has:
- Static public IP
🔹 STEP 5: Test Website Using Elastic IP
Open browser:
http://ELASTIC_IP
🟢 Your website should load
🔹 STEP 6: Confirm IP Stability (Understanding)
If you:
- Restart EC2 ❌ (DON’T DO NOW)
- Elastic IP will NOT change
🛑 IMPORTANT RULE
If you ever:
- Terminate EC2 👉 First release Elastic IP Otherwise AWS will charge
✅ TASK FOR YOU (LAB 4)
✔ Elastic IP allocated ✔ Elastic IP associated to EC2 ✔ Website opens using Elastic IP
🧪 EC2 HANDS-ON – LAB 5
👉 Attach a Domain to EC2 using Route 53 (Real-World Hosting)
🎯 Objective of This Lab
You will:
- Understand DNS & Domain flow
- Create a Hosted Zone in Route 53
- Map your Elastic IP → Domain
- Open your website using a domain name 🎉
🧠 First: Understand the Flow (VERY IMPORTANT)
When someone types:
www.example.com
What happens?
- Browser asks DNS
- DNS replies → Elastic IP
- Elastic IP points → EC2
- Apache sends the website
👉 Route 53 = DNS service
🧠 What is Route 53?
Amazon Route 53 is:
- AWS DNS service
- Converts domain → IP address
- Highly available & fast
⚠️ IMPORTANT NOTE (READ CAREFULLY)
There are TWO CASES:
✅ Case 1: You already bought a domain
(from GoDaddy / Namecheap / Route 53)
→ Continue with this lab
❌ Case 2: You don’t have a domain yet
→ You can still practice using a fake domain name (no website will open publicly, but concept is same)
I’ll explain both safely.
🔹 STEP 1: Open Route 53
- AWS Console → search Route 53
- Open Route 53
- Click Hosted zones
- Click Create hosted zone
🔹 STEP 2: Create Hosted Zone
Fill details:
-
Domain name Example:
devcloudpractice.com -
Type → Public Hosted Zone
Click Create hosted zone
📌 Hosted Zone = DNS control panel for your domain
🔹 STEP 3: Understand Name Servers (CRITICAL)
After creation, you’ll see 4 NS records, like:
ns-123.awsdns-45.com
ns-678.awsdns-90.net
...
📌 These are AWS DNS servers
🔹 STEP 4: Update Name Servers (Only if Domain Bought Outside AWS)
If your domain is from:
- GoDaddy
- Namecheap
- Hostinger
Go to domain provider:
- Open DNS / Nameserver settings
- Replace existing name servers
- Paste Route 53 name servers
- Save
⏳ DNS propagation: 5–30 minutes (sometimes 24 hrs)
⚠️ If domain bought from Route 53 → skip this step
🔹 STEP 5: Create A Record (Domain → EC2)
Inside Hosted Zone:
-
Click Create record
-
Record type → A
-
Record name:
- Leave empty → root domain
(
example.com)
- Leave empty → root domain
(
-
Value:
- Paste Elastic IP
-
TTL → default
-
Click Create records
📌 A record = maps domain → IP
🔹 STEP 6: (Optional) Create www Record
Create another record:
-
Record name:
www -
Type → A
-
Value → Elastic IP
This enables:
www.example.com
🔹 STEP 7: Test Your Domain 🎉
Open browser:
http://yourdomain.com
or
http://www.yourdomain.com
🟢 Your EC2 website should load
🧠 Real-World Knowledge (Interview Ready)
✔ Route 53 does not host websites ✔ It only does DNS resolution ✔ EC2 + Apache hosts the website ✔ Elastic IP ensures static mapping
🛑 Common Issues Checklist
| Issue | Fix |
|---|---|
| Site not opening | Wait DNS propagation |
| IP wrong | Check Elastic IP |
| Apache down | systemctl status httpd |
| HTTP blocked | Security Group port 80 |
✅ TASK FOR YOU (LAB 5)
✔ Hosted Zone created ✔ A record added ✔ Domain mapped to Elastic IP
🔐 EC2 Security Group – SSH, Ports, and IP Access
1️⃣ What is a Security Group in EC2?
-
A Security Group is a virtual firewall
-
It controls:
- Who can reach your EC2 instance
- On which port
-
It works at network level (before login)
👉 If traffic is not allowed by Security Group → EC2 never receives it.
2️⃣ What does 0.0.0.0/0 mean?
0.0.0.0/0 = ANY IP address on the internet
⚠️ This means publicly open to the world.
3️⃣ What does “My IP” mean?
When you select My IP, AWS:
- Detects your current public internet IP
- Sets the rule as:
x.x.x.x/32
/32 means:
- Only ONE exact IP
- Only your current network
👉 This is secure and recommended.
4️⃣ Understanding the 3 Important Ports
🔐 Port 22 – SSH
Used for:
- Remote login to EC2
- Full server control (admin access)
What SSH gives:
- File access
- Command execution
- Full OS control
👉 This is the most sensitive port
🌐 Port 80 – HTTP
Used for:
- Website access via browser
- Public web traffic
What HTTP gives:
- Only what your application exposes
- No OS access
- No command execution
👉 Designed to be public
⚙️ Port 8080 – Application Port
Used for:
- Spring Boot
- Node.js
- Test applications
Access level:
- Application only
- Not OS-level
👉 Safe for testing, risky if admin APIs are exposed
5️⃣ Why ONLY SSH is dangerous when open to 0.0.0.0/0
Key reason:
SSH provides full administrative access to the server
Comparison:
| Port | Access Type | Risk |
|---|---|---|
| 22 (SSH) | Full OS control | 🔥 Very High |
| 80 (HTTP) | Web content only | 🟢 Low |
| 8080 | App-level access | 🟡 Medium |
👉 Admin access should never be public
6️⃣ What happens if SSH is set to 0.0.0.0/0
Important clarification:
❌ Anyone CANNOT login without .pem key
✅ Anyone CAN try to connect
What attackers can do:
-
Scan your public IP
-
Detect open port 22
-
Attempt:
- Usernames
- Stolen keys
- Brute-force attacks
Even if they fail:
- Continuous attack attempts
- Log flooding
- Resource usage
- High security risk
7️⃣ Two Levels of EC2 Security (Very Important)
Level 1️⃣: Security Group (Network Gate)
- Controls who can reach the port
Level 2️⃣: SSH Authentication (Login Lock)
-
Requires:
- Correct username
- Correct private key (
.pem)
👉 0.0.0.0/0 opens the gate, not the lock
8️⃣ Why .pem key is still required
- EC2 uses key-based authentication
- Password login is disabled by default
- Private key is never sent over the network
So:
- ❌ No
.pem→ No login - ❌ Even AWS can’t login without it
9️⃣ Recommended Safe Configuration
| Port | Source | Status |
|---|---|---|
| 22 (SSH) | My IP | ✅ Secure |
| 80 (HTTP) | 0.0.0.0/0 | ✅ Required |
| 8080 | 0.0.0.0/0 (temporary) | ⚠️ OK for testing |
🔐 Golden Security Rule (Must Remember)
Never expose administrative access (SSH) to the public internet.
- SSH → restrict to your IP
- HTTP/HTTPS → public
- App ports → open only if needed
🎯 Interview-Ready One-Line Answer
Opening SSH to 0.0.0.0/0 allows anyone on the internet to attempt connections, increasing attack risk. SSH must be restricted to trusted IPs, while HTTP is designed for public access.
🧪 EC2 HANDS-ON – LAB 6
👉 Security Groups (Inbound & Outbound Rules – Deep Hands-On)
🎯 Objective of LAB 6
By the end of this lab, you will:
- Create & modify Security Group rules
- Understand Inbound vs Outbound
- Prove that Security Groups are STATEFUL
- Be able to explain this confidently in interviews
🧠 FIRST: What is a Security Group? (Very Simple)
A Security Group (SG) is:
- A virtual firewall
- Controls who can access your EC2
- Works at instance level
Think like this:
Security Group = Security guard at the door 🚪 Only allowed people can enter
🧠 IMPORTANT RULE (MEMORIZE)
❗ Security Groups:
- ✅ Allow rules only
- ❌ No deny rules
- ✅ Are STATEFUL
We will prove this practically.
🔹 STEP 1: Open Your EC2 Security Group
- AWS Console → EC2
- Click Instances
- Select your instance
ec2-hands-on-1 - Go to Security tab
- Click the Security group name
You are now inside Security Group settings
🔹 STEP 2: Understand Existing Inbound Rules
You should already see something like:
| Type | Port | Source |
|---|---|---|
| SSH | 22 | My IP |
| HTTP | 80 | Anywhere |
What this means:
- SSH → You can connect from your laptop
- HTTP → Anyone can open your website
🔹 STEP 3: TEST 1 – Remove HTTP Access (Hands-On Proof)
❌ Remove HTTP Rule
- Click Edit inbound rules
- ❌ Delete HTTP (port 80)
- Click Save rules
🔍 TEST IN BROWSER
Open:
http://ELASTIC_IP
Expected Result:
❌ Website WILL NOT OPEN
✅ This proves:
- Security Group controls traffic
- Port 80 is required for web access
🔹 STEP 4: Add HTTP Rule Back
- Edit inbound rules
- Add rule:
| Setting | Value |
|---|---|
| Type | HTTP |
| Port | 80 |
| Source | Anywhere (0.0.0.0/0) |
- Save rules
🔁 Refresh browser
Result:
🟢 Website opens again
🔹 STEP 5: TEST 2 – Change SSH Source (IMPORTANT)
❌ Break SSH Access (on purpose)
- Edit inbound rules
- Change SSH source from:
My IP
to:
0.0.0.0/0
- Save
📌 Meaning:
- Anyone on internet can try SSH (❌ unsafe)
⚠️ We will fix it later
🔹 STEP 6: Understand INBOUND vs OUTBOUND
Inbound Rules
👉 Who can come IN to EC2 Examples:
- SSH (22)
- HTTP (80)
Outbound Rules
👉 Where EC2 can go OUT
Default outbound rule:
All traffic → 0.0.0.0/0
📌 Means:
- EC2 can access internet
- Install updates
- Download packages
🔹 STEP 7: STATEFUL PROOF (VERY IMPORTANT)
Security Groups are STATEFUL.
What does that mean?
If:
- Inbound request is allowed Then:
- Response is automatically allowed (No outbound rule needed)
📌 Example:
- Browser → EC2 (HTTP allowed)
- EC2 → Browser (response allowed automatically)
💡 This is interview GOLD
🔹 STEP 8: FIX SECURITY (BEST PRACTICE)
Now make SSH secure again 👇
- Edit inbound rules
- Change SSH source back to:
My IP
- Save
✅ Your EC2 is secure again
🧠 INTERVIEW-READY ANSWER (MEMORIZE)
Security Group is a stateful virtual firewall that controls inbound and outbound traffic at the EC2 instance level. It supports only allow rules, and responses to allowed inbound traffic are automatically permitted.
✅ LAB 6 TASK CHECKLIST
✔ Removed HTTP and tested ✔ Added HTTP and tested ✔ Understood inbound vs outbound ✔ Proved STATEFUL behavior ✔ Secured SSH again
🧪 EC2 HANDS-ON – LAB 7
👉 Network ACL (NACL) vs Security Group (Hands-On + Deep Clarity)
🎯 Objective of LAB 7
By the end of this lab, you will:
- Create & modify a Network ACL
- See how it works at subnet level
- PROVE it is STATELESS
- Understand NACL vs Security Group (interview-ready)
🧠 FIRST: What is a Network ACL? (Simple Words)
A Network ACL (NACL) is:
- A firewall for a subnet
- Works before traffic reaches EC2
- Applies to ALL instances in that subnet
Think like:
NACL = Security gate at society entrance 🏢 Security Group = Guard at each flat 🚪
🧠 VERY IMPORTANT RULES (MEMORIZE)
| Feature | NACL |
|---|---|
| Level | Subnet |
| Rules | Allow + Deny |
| Nature | STATELESS |
| Order | Rule number (100, 110…) |
| Default | Allow all |
🔹 STEP 1: Open Network ACLs
- AWS Console → VPC
- Left menu → Network ACLs
- You will see a default NACL
🔹 STEP 2: Identify Your Subnet
- Go to EC2 → Instances
- Click your instance
- Note Subnet ID
📌 We will apply NACL to this subnet
🔹 STEP 3: Create Custom NACL
-
VPC → Network ACLs
-
Click Create network ACL
-
Name:
ec2-hands-on-nacl -
Select your VPC
-
Click Create
🔹 STEP 4: Associate NACL with Subnet
- Select your new NACL
- Go to Subnet associations
- Click Edit subnet associations
- Select your EC2 subnet
- Save
⚠️ This NACL now controls traffic for your EC2
🔹 STEP 5: BLOCK HTTP Using NACL (Hands-On Proof)
Inbound Rule – DENY HTTP
- Select Inbound rules
- Click Edit inbound rules
- Add rule:
| Rule # | Type | Port | Source | Action |
|---|---|---|---|---|
| 100 | HTTP | 80 | 0.0.0.0/0 | DENY |
- Save
🔍 TEST IN BROWSER
Open:
http://ELASTIC_IP
❌ Website WILL NOT OPEN
📌 Even though:
- Security Group allows HTTP
- NACL denies it
👉 NACL blocks first
🔹 STEP 6: ALLOW HTTP Again
Add ALLOW rule with higher priority:
| Rule # | Type | Port | Source | Action |
|---|---|---|---|---|
| 90 | HTTP | 80 | 0.0.0.0/0 | ALLOW |
📌 Rule 90 runs before 100
🔁 Refresh browser → 🟢 Works
🔹 STEP 7: PROVE STATELESS BEHAVIOR (IMPORTANT)
❌ Remove Outbound Rule
- Go to Outbound rules
- Delete rule:
ALLOW ALL (0.0.0.0/0)
- Save
🔍 Test Website Again
❌ Website WILL NOT LOAD
📌 Why?
- Inbound allowed
- Outbound response blocked
👉 This PROVES NACL is STATELESS
🔹 STEP 8: FIX OUTBOUND RULE (IMPORTANT)
Add outbound rule:
| Rule # | Type | Port | Destination | Action |
|---|---|---|---|---|
| 100 | HTTP | 80 | 0.0.0.0/0 | ALLOW |
Also add:
| Rule # | Type | Port | Destination | Action |
|---|---|---|---|---|
| 110 | HTTPS | 443 | 0.0.0.0/0 | ALLOW |
Save
🔹 STEP 9: FINAL COMPARISON (INTERVIEW TABLE)
| Feature | Security Group | NACL |
|---|---|---|
| Level | Instance | Subnet |
| Rules | Allow only | Allow + Deny |
| Nature | Stateful | Stateless |
| Rule Order | No order | Number based |
| Scope | Specific EC2 | All in subnet |
🧠 INTERVIEW-READY ANSWER
Security Groups act as a stateful firewall at the instance level allowing only permitted traffic, whereas Network ACLs operate at the subnet level, are stateless, and support both allow and deny rules evaluated in order.
⚠️ CLEANUP (VERY IMPORTANT)
To avoid confusion later:
- Either restore default NACL
- Or keep both inbound & outbound properly allowed
✅ LAB 7 TASK CHECKLIST
✔ Created custom NACL ✔ Associated subnet ✔ Denied & allowed HTTP ✔ Proved stateless behavior ✔ Understood SG vs NACL clearly
🧪 EC2 HANDS-ON – LAB 8
👉 EC2 Key Pairs (Create, Use, Delete & Recover Access)
🎯 Objective of LAB 8
You will:
- Understand what a key pair really is
- Create & attach new key pairs
- Know what happens if key is deleted
- Learn key recovery concept (very important)
🧠 FIRST: What is an EC2 Key Pair?
A Key Pair has:
- Public key → Stored in EC2
- Private key (.pem) → Stored on your laptop
Think like:
Lock (public key) is on server 🔒 Key (private key) is with you 🔑
AWS never stores private key.
🔹 STEP 1: View Existing Key Pair
- EC2 Console → Key Pairs
- You will see:
ec2-key-hands-on
📌 AWS only shows key name, not the file
🔹 STEP 2: Create a SECOND Key Pair
- Click Create key pair
- Name:
ec2-key-backup
- Type: RSA
- Format: .pem
- Create & download
📌 This is for learning purpose
🔹 STEP 3: Understand a CRITICAL RULE
❗ You cannot directly change key pair of:
- Running instance
- Stopped instance
Key pair is:
- Injected at launch time
🔹 STEP 4: What Happens If Key is Deleted? (Concept)
Scenario:
.pemfile deleted from laptop ❌- EC2 still running
Result:
❌ You are LOCKED OUT
AWS cannot recover it
🔹 STEP 5: HOW TO RECOVER ACCESS (IMPORTANT CONCEPT)
There are 3 real-world recovery methods:
🟢 Method 1: EC2 Instance Connect (AWS Linux only)
-
Works only if:
- Instance supports it
- Port 22 allowed
-
Temporary access
🟢 Method 2: Detach Root Volume (MOST COMMON)
Steps (conceptual):
- Stop instance
- Detach root EBS
- Attach it to another EC2
- Add new public key to:
~/.ssh/authorized_keys
- Reattach volume
- Start instance
📌 Very important interview topic
🟢 Method 3: Session Manager (BEST PRACTICE)
- Uses IAM Role
- No SSH, no key pair
- Secure & auditable
We’ll do this hands-on later
🔹 STEP 6: BEST PRACTICES (MEMORIZE)
✔ Always keep backup key
✔ Use IAM Roles + Session Manager
✔ Never share .pem
✔ Restrict SSH source
✔ Rotate keys in production
🧠 INTERVIEW-READY ANSWER
An EC2 key pair consists of a public key stored on the instance and a private key held by the user. AWS does not store the private key, and if it is lost, access must be recovered through volume attachment or Session Manager.
🛑 DO NOT TRY KEY RECOVERY NOW
We will do it safely in advanced labs.
✅ LAB 8 TASK CHECKLIST
✔ Understood key pair concept ✔ Created backup key ✔ Learned recovery methods ✔ Understood best practices
🧪 EC2 HANDS-ON – LAB 9
👉 EC2 User Data (Automatic Setup at Launch)
🎯 Objective of LAB 9
By the end of this lab, you will:
- Understand what User Data is
- Use User Data to auto-install Apache
- Deploy a website WITHOUT SSH
- Learn cloud-init concept (interview topic)
🧠 FIRST: What is EC2 User Data? (Very Simple)
User Data is:
- A script that runs only once
- Runs when EC2 starts for the first time
- Used for automation
Think like:
User Data = Auto-setup instructions for EC2 🧠
Example:
- Install Apache
- Start service
- Create website
- Configure app
🧠 VERY IMPORTANT RULES (MEMORIZE)
❗ User Data:
- Runs only at first launch
- Runs as root user
- Uses cloud-init
- Best for bootstrapping
🔹 WHAT WE WILL DO (PLAN)
We will:
- Launch NEW EC2 instance
- Add User Data script
- Apache installs automatically
- Website works without SSH
🔹 STEP 1: Launch a NEW EC2 Instance
Go to: EC2 → Instances → Launch instance
Instance name:
ec2-userdata-demo
🔹 STEP 2: Choose AMI & Instance Type
- AMI → Amazon Linux 2023
- Instance type → t2.micro (Free tier)
🔹 STEP 3: Select Key Pair
Choose:
ec2-key-hands-on
(We won’t SSH, but AWS requires it)
🔹 STEP 4: Network & Security Group
Inbound rules:
| Type | Port | Source |
|---|---|---|
| HTTP | 80 | Anywhere |
| SSH | 22 | My IP |
🔹 STEP 5: ADD USER DATA (MOST IMPORTANT)
Scroll down → Advanced details
Find:
👉 User data
Paste EXACTLY this:
#!/bin/bash
dnf update -y
dnf install httpd -y
systemctl start httpd
systemctl enable httpd

echo "<h1>Hello from EC2 User Data 🚀</h1>" > /var/www/html/index.html
🧠 EXPLAIN SCRIPT LINE BY LINE (IMPORTANT)
#!/bin/bash
➡ Tells EC2: “This is a Linux shell script”
dnf update -y
➡ Updates system packages
dnf install httpd -y
➡ Installs Apache web server
systemctl start httpd
➡ Starts Apache
systemctl enable httpd
➡ Starts Apache on reboot
echo "<h1>Hello from EC2 User Data 🚀</h1>" > /var/www/html/index.html
➡ Creates website homepage automatically
🔹 STEP 6: Launch Instance
Click Launch instance
Wait until: 🟢 Instance state → Running
🔹 STEP 7: Test WITHOUT SSH (BIG MOMENT 🎉)
- Copy Public IP
- Open browser:
http://PUBLIC_IP
Expected Output:
Hello from EC2 User Data 🚀
✅ Apache installed ✅ Website deployed ✅ No manual work
🔹 STEP 8: Verify User Data Ran (Optional SSH)
If you want to check logs:
sudo cat /var/log/cloud-init-output.log
📌 Shows user data execution logs
🧠 INTERVIEW-READY ANSWER
EC2 User Data is a cloud-init based mechanism that allows running scripts at instance launch to automate configuration such as installing software and starting services. It runs only once at first boot.
⚠️ COMMON MISTAKES (VERY IMPORTANT)
❌ Forget #!/bin/bash
❌ Wrong indentation
❌ Expecting script to run again after reboot
❌ Missing HTTP rule in SG
✅ LAB 9 TASK CHECKLIST
- ✔ New EC2 launched
- ✔ User Data added
- ✔ Apache auto-installed
- ✔ Website works without SSH
- ✔ Understood automation concept
🧪 EC2 HANDS-ON – LAB 10
👉 EC2 Instance Lifecycle (Start, Stop, Reboot, Terminate)

🎯 Objective of LAB 10
You will:
- Perform Start / Stop / Reboot / Terminate
- Understand what happens to IP, storage, billing
- Learn when to use each action
- Be interview-ready
🧠 FIRST: EC2 Lifecycle States (Simple)
An EC2 instance can be in:
| State | Meaning |
|---|---|
| Pending | Starting |
| Running | Active |
| Stopped | Powered off |
| Terminated | Deleted forever |
🔹 STEP 1: Identify Two Instances
You should have:
ec2-hands-on-1(Elastic IP attached)ec2-userdata-demo
We will safely test lifecycle on ec2-userdata-demo
🔹 STEP 2: STOP the Instance
- EC2 → Instances
- Select
ec2-userdata-demo - Instance state → Stop
- Confirm
🔍 What Happens When STOP?
| Item | Result |
|---|---|
| Instance | OFF |
| Billing | ❌ No compute cost |
| EBS root | ✅ Preserved |
| Public IP | ❌ Released |
| Elastic IP | ❌ Not attached |
🔹 STEP 3: START the Instance Again
- Select instance
- Instance state → Start
Wait → Running
🔍 Check Public IP
- Public IP will be NEW
- Website still works (Apache already installed)
📌 This proves:
- Data remains
- Public IP changes
🔹 STEP 4: REBOOT the Instance
- Select instance
- Instance state → Reboot
🔍 What Happens When REBOOT?
| Item | Result |
|---|---|
| OS | Restarts |
| Public IP | ✅ Same |
| Data | ✅ Safe |
| Billing | ✅ Continues |
📌 Reboot = Restart laptop
🔹 STEP 5: TERMINATE the Instance (IMPORTANT)
⚠️ THIS IS DESTRUCTIVE
- Select
ec2-userdata-demo - Instance state → Terminate
- Confirm
🔍 What Happens When TERMINATE?
| Item | Result |
|---|---|
| Instance | ❌ Deleted |
| EBS root | ❌ Deleted |
| Public IP | ❌ Gone |
| Recovery | ❌ Impossible |
📌 Terminate = Delete forever
🧠 VERY IMPORTANT INTERVIEW POINTS
- Stop → Save money
- Start → New public IP
- Reboot → Same IP
- Terminate → Data lost
🧠 INTERVIEW-READY ANSWER
Stopping an EC2 instance halts compute billing while preserving EBS volumes, whereas terminating an instance permanently deletes the instance and associated root volume, making recovery impossible.
⚠️ COST BEST PRACTICES
- Stop unused instances
- Use Elastic IP for static access
- Terminate unused test EC2s
- Monitor free tier usage
✅ LAB 10 TASK CHECKLIST
- Stopped instance
- Started instance
- Rebooted instance
- Terminated test instance
- Understood lifecycle fully
🧪 EC2 HANDS-ON – LAB 11
👉 EBS Volumes (Attach, Mount, Detach & Resize)

🎯 Objective of LAB 11
By the end of this lab, you will:
- Understand what EBS is
- Create an extra EBS volume
- Attach it to EC2
- Mount it inside Linux
- Resize it safely
- Be interview-ready
🧠 FIRST: What is EBS? (Simple Words)
EBS (Elastic Block Store) is:
- A virtual hard disk
- Used by EC2
- Persistent storage
Think like:
EC2 = Laptop 💻 EBS = Hard disk 💾
Even if EC2 stops → data stays.
🧠 IMPORTANT TYPES (FOR NOW)
We’ll use:
- gp3 (General Purpose SSD)
📌 Free tier friendly 📌 Balanced performance
🔹 STEP 1: Identify Your EC2 Instance
Use:
ec2-hands-on-1
⚠️ Do NOT use terminated instance
🔹 STEP 2: Create a NEW EBS Volume
- AWS Console → EC2
- Left menu → Volumes
- Click Create volume
Fill details:
- Volume type → gp3
- Size → 5 GiB
- Availability Zone → SAME as EC2
- Name:
ebs-hands-on-1
Click Create volume
📌 AZ must match EC2 AZ
🔹 STEP 3: Attach EBS Volume to EC2
- Select volume
ebs-hands-on-1 - Actions → Attach volume
- Instance →
ec2-hands-on-1 - Device →
/dev/xvdf - Attach
🔹 STEP 4: Connect to EC2 (SSH)
ssh -i ec2-key-hands-on.pem ec2-user@ELASTIC_IP
🔹 STEP 5: Check Disk is Attached
Run:
lsblk
📌 Explanation:
lsblk→ list block devices (disks)
You will see:
xvda→ root diskxvdf→ new EBS (no mount yet)
🔹 STEP 6: Format the New Volume
sudo mkfs -t xfs /dev/xvdf
📌 Explanation:
mkfs→ make filesystemxfs→ Linux filesystem/dev/xvdf→ new disk
⚠️ Formatting erases data (safe now)
🔹 STEP 7: Create Mount Directory
Mounting an EBS volume is the process of making an attached storage volume accessible to the operating system at a specific directory path.
sudo mkdir /data
📌 /data = folder to access EBS
❓ Why mounting is required?
Because:
- EC2 OS doesn’t know where to store data
- EBS is just a block device
- OS needs a mount point (folder)
🔐 What happens if you DON’T mount?
- Volume is attached ✔
- OS cannot read/write ❌
- Storage is wasted
🔹 STEP 8: Mount the Volume
sudo mount /dev/xvdf /data
🔹 STEP 9: Verify Mount
df -h
📌 You should see /data mounted
🔹 STEP 10: Make Mount Persistent (IMPORTANT)
Open fstab:
sudo nano /etc/fstab
Add line at bottom:
/dev/xvdf /data xfs defaults,nofail 0 2
Save & exit:
- CTRL + X → Y → Enter
📌 This ensures mount survives reboot
🔹 STEP 11: Resize EBS Volume (Hands-On)
Increase volume size
- EC2 → Volumes
- Select
ebs-hands-on-1 - Actions → Modify volume
- Change size:
5 → 10 GiB
- Save
Extend filesystem (inside EC2)
sudo xfs_growfs /data
📌 Expands filesystem to new size
Verify:
df -h
🧠 VERY IMPORTANT INTERVIEW POINTS
✔ EBS is AZ-specific ✔ EBS is persistent ✔ Can attach/detach ✔ Can resize without downtime ✔ Root volume is also EBS
🧠 INTERVIEW-READY ANSWER
Amazon EBS is a persistent block storage service designed for EC2 instances. It provides durable storage that can be attached, detached, resized, and snapshotted independently of the instance lifecycle.
⚠️ COMMON MISTAKES
❌ Different AZ for volume
❌ Forgetting filesystem resize
❌ Not updating /etc/fstab
❌ Formatting wrong disk
✅ LAB 11 TASK CHECKLIST
✔ Created EBS volume ✔ Attached to EC2 ✔ Formatted & mounted ✔ Made persistent ✔ Resized volume
🧪 EC2 HANDS-ON – LAB 12
👉 EBS Snapshots & Restore (Backup & Disaster Recovery)
🎯 Objective of LAB 12
By the end of this lab, you will:
- Create an EBS snapshot (backup)
- Restore a new volume from snapshot
- Attach it to EC2
- Prove data recovery
- Understand real-world backup strategy
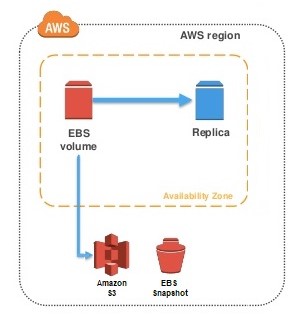
🧠 FIRST: What is an EBS Snapshot? (Simple)
An EBS Snapshot is:
- A backup of an EBS volume
- Stored in Amazon S3 (managed by AWS)
- Incremental (only changes are saved)
Think like:
Snapshot = Photo of your disk 📸 Volume = Live hard disk 💾
🧠 VERY IMPORTANT RULES (MEMORIZE)
✔ Snapshots are AZ-independent ✔ Volumes are AZ-dependent ✔ Snapshots are incremental ✔ Used for backup & restore
🔹 STEP 1: Put Test Data on EBS Volume
SSH into your EC2:
ssh -i ec2-key-hands-on.pem ec2-user@ELASTIC_IP
Create a test file:
sudo echo "EBS Snapshot Test File" > /data/test.txt
Verify:
cat /data/test.txt
🔹 STEP 2: Create Snapshot
- AWS Console → EC2
- Left menu → Volumes
- Select volume
ebs-hands-on-1 - Actions → Create snapshot
Details:
- Name:
snapshot-ebs-hands-on-1
- Description:
Backup before changes
Click Create snapshot
🔹 STEP 3: Verify Snapshot
- Go to Snapshots
- Status → Completed
📌 Snapshot is safely stored
🔹 STEP 4: Create NEW Volume from Snapshot
- Select snapshot
- Actions → Create volume
Settings:
- Volume type → gp3
- Availability Zone → Same as EC2
- Size → Leave default
- Name:
ebs-restored-from-snapshot
Click Create volume
🔹 STEP 5: Attach Restored Volume to EC2
- Select new volume
- Actions → Attach volume
- Instance →
ec2-hands-on-1 - Device →
/dev/xvdg - Attach
🔹 STEP 6: Verify New Disk Inside EC2
lsblk
You should see:
xvdg→ restored volume
🔹 STEP 7: Mount Restored Volume
Create mount folder:
sudo mkdir /restore
Mount:
sudo mount /dev/xvdg /restore
🔹 STEP 8: VERIFY DATA RECOVERY (MOST IMPORTANT)
ls /restore
cat /restore/test.txt
🎉 Output:
EBS Snapshot Test File
✅ Backup & restore successful
🧠 REAL-WORLD USE CASES
- Backup before OS upgrade
- Disaster recovery
- Clone environments
- Create AMIs
- Cross-region backup (copy snapshot)
🧠 INTERVIEW-READY ANSWER
An EBS snapshot is an incremental backup of an EBS volume stored in Amazon S3. Snapshots are AZ-independent and can be used to restore volumes or create new volumes across Availability Zones.
⚠️ COMMON MISTAKES
- ❌ Creating volume in wrong AZ
- ❌ Forgetting to mount restored volume
- ❌ Assuming snapshot is full copy (it’s incremental)
- ❌ Deleting snapshot before restore
✅ LAB 12 TASK CHECKLIST
- ✔ Created snapshot
- ✔ Restored volume
- ✔ Attached to EC2
- ✔ Mounted volume
- ✔ Verified recovered data
🧪 EC2 HANDS-ON – LAB 13
👉 Create Custom AMI (Golden Image for EC2)

🎯 Objective of LAB 13
By the end of this lab, you will:
- Create a custom AMI
- Launch new EC2 from that AMI
- Prove pre-installed software exists
- Understand Golden AMI concept
- Be interview-ready
🧠 FIRST: What is an AMI? (Simple Words)
An AMI (Amazon Machine Image) is:
-
A template for EC2
-
Contains:
- OS
- Installed software
- Configurations
-
Used to launch multiple identical EC2s
Think like:
AMI = Clone of your configured server 🧬
🧠 GOLDEN AMI (VERY IMPORTANT)
A Golden AMI:
- Has OS patches
- Has required software
- Has security hardening
- Used across environments
📌 Used by:
- Auto Scaling
- Dev / QA / Prod
🔹 STEP 1: Prepare Your EC2 for AMI
We’ll use:
ec2-hands-on-1
Confirm:
- Apache installed
- Website working
- EBS attached
(Optional check):
systemctl status httpd
🔹 STEP 2: Create AMI from EC2
- EC2 Console → Instances
- Select
ec2-hands-on-1 - Actions → Image and templates
- Click Create image
Fill Details:
- Image name:
ec2-golden-ami-v1
- Description:
Apache + custom configuration
- Leave defaults (Reboot = YES)
Click Create image
📌 AWS creates:
- AMI
- Snapshots of attached EBS volumes
🔹 STEP 3: Track AMI Creation
- Go to AMIs
- Status → Pending → Available
📌 Wait until Available
🔹 STEP 4: Launch New EC2 from Custom AMI
- Select AMI
ec2-golden-ami-v1 - Click Launch instance from AMI
Configure:
- Instance name:
ec2-from-golden-ami
- Instance type → t2.micro
- Key pair → existing
- Security group → allow HTTP + SSH
- Launch
🔹 STEP 5: Test NEW EC2
- Copy Public IP
- Open browser:
http://PUBLIC_IP
🎉 Website should load immediately ❌ No installation needed
🔹 STEP 6: PROOF (Optional SSH)
SSH into new EC2:
ssh -i ec2-key-hands-on.pem ec2-user@NEW_PUBLIC_IP
Check:
systemctl status httpd
Result:
active (running)
🧠 REAL-WORLD USE CASES
- ✔ Auto Scaling Groups
- ✔ Faster deployments
- ✔ Consistent environments
- ✔ Rollback strategy
🧠 INTERVIEW-READY ANSWER
An AMI is a pre-configured template containing the operating system, applications, and settings required to launch EC2 instances. A Golden AMI ensures consistency and faster provisioning across environments.
⚠️ IMPORTANT BEST PRACTICES
- ✔ Version your AMIs
- ✔ Patch before AMI creation
- ✔ Delete unused AMIs
- ✔ Tag AMIs properly
✅ LAB 13 TASK CHECKLIST
- ✔ Created custom AMI
- ✔ Launched EC2 from AMI
- ✔ Website worked instantly
- ✔ Understood Golden AMI concept
🧪 EC2 HANDS-ON – LAB 14
👉 Root Volume vs Additional EBS Volumes (Deep Practical Understanding)
🎯 Objective of LAB 14
By the end of this lab, you will:
- Clearly understand root volume
- Understand additional EBS volumes
- See Delete on Termination in action
- Know real-world best practices
- Be interview-ready
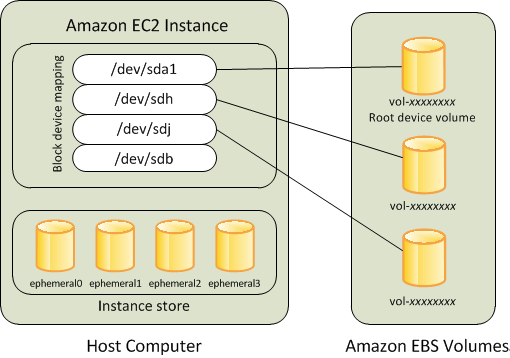
🧠 FIRST: What is Root Volume? (Simple Words)
The root volume:
- Contains the OS (Amazon Linux)
- Is attached at launch
- Usually named:
/dev/xvda
Think like:
Root volume = Laptop C: drive 💻
Without root volume → EC2 cannot boot
🧠 What is Additional EBS Volume?
Additional EBS:
-
Extra disks you attach later
-
Used for:
- App data
- Logs
- Databases
-
Examples:
/dev/xvdf
/dev/xvdg
Think like:
Additional EBS = External hard disk 💾
🔹 STEP 1: Identify Volumes on Your EC2
SSH into EC2:
ssh -i ec2-key-hands-on.pem ec2-user@ELASTIC_IP
Run:
lsblk
You will see:
xvda→ Root volumexvdf→ Additional EBSxvdg→ Snapshot-restored EBS
🔹 STEP 2: Check Mount Points
df -h
You will see:
/→ Root volume/data→ Additional EBS/restore→ Snapshot EBS
📌 Root volume mounts at /
🔹 STEP 3: Check “Delete on Termination” (IMPORTANT)
- EC2 Console → Instances
- Select
ec2-hands-on-1 - Go to Storage tab
- Click Volume ID of root volume
Look for:
Delete on termination: Yes
📌 Meaning:
- If EC2 terminates
- Root volume is deleted
🔹 STEP 4: Check Additional EBS Delete Behavior
Click additional EBS volume:
You’ll see:
Delete on termination: No
📌 Meaning:
- Data survives EC2 termination
- Used for backups & safety
🔹 STEP 5: PRACTICAL SCENARIO (CONCEPT)
If EC2 is TERMINATED:
| Volume Type | Result |
|---|---|
| Root volume | ❌ Deleted |
| Additional EBS | ✅ Preserved |
📌 That’s why:
- App data should be on separate EBS
- OS only on root
🔹 STEP 6: BEST PRACTICE (REAL WORLD)
- ✔ Keep OS on root volume
- ✔ Keep data/logs on separate EBS
- ✔ Disable delete-on-termination for critical volumes
- ✔ Take snapshots regularly
🧠 INTERVIEW-READY ANSWER
The root volume contains the operating system and is required for booting an EC2 instance, while additional EBS volumes are used for application data. By default, the root volume is deleted on termination, whereas additional volumes persist unless explicitly configured otherwise.
⚠️ COMMON MISTAKES
- ❌ Storing critical data on root volume
- ❌ Not checking delete-on-termination
- ❌ Forgetting to back up additional volumes
✅ LAB 14 TASK CHECKLIST
- ✔ Identified root vs additional volumes
- ✔ Checked mount points
- ✔ Understood delete-on-termination
- ✔ Learned real-world design practice
🧪 EC2 HANDS-ON – LAB 15
👉 EBS vs Instance Store (Performance vs Persistence)
🎯 Objective of LAB 15
By the end of this lab, you will:
- Understand Instance Store
- Compare EBS vs Instance Store
- Know when to use each
- Be interview-ready
🧠 FIRST: What is Instance Store?
Instance Store is:
-
Temporary (ephemeral) storage
-
Physically attached to EC2 host
-
Data is lost if:
- Instance stops
- Instance terminates
- Host fails
Think like:
Instance Store = RAM disk / temporary scratch space ⚡
🧠 What is EBS? (Reminder)
EBS:
- Persistent block storage
- Independent of EC2 lifecycle
- Backed by AWS-managed infrastructure
Think like:
EBS = External hard disk 💾
🔹 HANDS-ON NOTE (IMPORTANT)
⚠️ Free Tier usually does NOT support Instance Store
So we’ll do:
- Conceptual + console visibility
- Real-world explanation (interview focus)
🔹 STEP 1: Identify Instance Store Support
-
EC2 → Launch instance
-
Select an instance type like:
i3,i4,d2
You’ll see:
Instance store volumes available
📌 These instance types support instance store
🔹 STEP 2: Understand Storage at Launch
When instance store is used:
- Disk appears as:
/dev/nvme1n1
- Must be formatted manually
- Not persistent
🔹 STEP 3: EBS vs Instance Store (INTERVIEW TABLE)
| Feature | EBS | Instance Store |
|---|---|---|
| Persistence | ✅ Yes | ❌ No |
| Data survives stop | ✅ Yes | ❌ No |
| Snapshot | ✅ Yes | ❌ No |
| Performance | Good | Very High |
| Cost | Paid | Included |
| Use case | Databases | Cache / temp |
🔹 STEP 4: REAL-WORLD USE CASES
Use EBS when:
- ✔ Databases
- ✔ App data
- ✔ Logs
- ✔ Backups
Use Instance Store when:
- ✔ Cache
- ✔ Buffer
- ✔ Temporary data
- ✔ High-speed scratch space
🧠 INTERVIEW-READY ANSWER
Amazon EBS provides persistent block storage independent of the EC2 lifecycle, whereas Instance Store offers high-performance, ephemeral storage that is lost when the instance stops or terminates.
⚠️ COMMON MISTAKES
- ❌ Using instance store for databases
- ❌ Expecting data persistence
- ❌ No backups
✅ LAB 15 TASK CHECKLIST
- ✔ Understood instance store
- ✔ Compared with EBS
- ✔ Learned performance trade-offs
- ✔ Interview clarity achieved
🧪 EC2 HANDS-ON – LAB 16
👉 Multi-AZ EC2 Deployment (High Availability Basics)
🎯 Objective of LAB 16
By the end of this lab, you will:
- Understand Availability Zones (AZs) deeply
- Launch EC2 instances in multiple AZs
- Prove why Multi-AZ is needed
- Be able to explain HA architecture in interviews
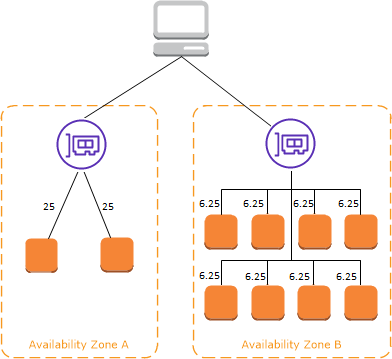
🧠 FIRST: What is an Availability Zone? (Very Simple)
An Availability Zone (AZ) is:
- One or more physically separate data centers
- Inside a single AWS region
- Connected with high-speed private network
Example (Mumbai region):
ap-south-1a
ap-south-1b
ap-south-1c
Think like:
Region = City 🏙️ AZ = Different buildings in the city 🏢🏢🏢
🧠 Why Multi-AZ is IMPORTANT?
If you use only ONE AZ:
- Power failure ❌
- Network issue ❌
- Fire / flood ❌ ➡️ Your application goes DOWN
If you use MULTI-AZ:
- One AZ fails ❌
- Other AZ still works ✅ ➡️ Application stays UP
👉 This is called High Availability
🔹 STEP 1: Check AZ of Your Existing EC2
- EC2 → Instances
- Select
ec2-hands-on-1 - Check:
Availability Zone
Example:
ap-south-1a
📌 Right now → Single-AZ architecture
🔹 STEP 2: Launch SECOND EC2 in DIFFERENT AZ
We will launch another EC2, but in a different AZ.
Launch Instance:
- Name:
ec2-hands-on-az2
-
AMI: Amazon Linux 2023
-
Instance type: t2.micro
-
Key pair: existing
-
Security group:
- SSH (22) → My IP
- HTTP (80) → Anywhere
🔥 IMPORTANT (AZ SELECTION)
In Network settings → Subnet:
- Select a subnet from a different AZ
Example:
- First EC2 →
ap-south-1a - Second EC2 →
ap-south-1b
📌 This step is CRITICAL
🔹 STEP 3: Launch & Verify
Wait until: 🟢 Instance state → Running
Now you have:
- EC2 in AZ-A
- EC2 in AZ-B
✅ Multi-AZ setup achieved
🔹 STEP 4: Install Apache on SECOND EC2
SSH into second EC2:
ssh -i ec2-key-hands-on.pem ec2-user@SECOND_PUBLIC_IP
Install Apache:
sudo dnf install httpd -y
sudo systemctl start httpd
sudo systemctl enable httpd
Create page:
echo "<h1>Hello from AZ-2 EC2</h1>" | sudo tee /var/www/html/index.html
🔹 STEP 5: Test Both EC2s
Browser tests:
EC2-1 (AZ-A):
http://IP-OF-EC2-1
EC2-2 (AZ-B):
http://IP-OF-EC2-2
✅ Both websites work independently
🔹 STEP 6: FAILURE SCENARIO (CONCEPTUAL)
Imagine:
- AZ-A goes DOWN ❌
What happens?
| Setup | Result |
|---|---|
| Single-AZ | App DOWN ❌ |
| Multi-AZ | App STILL UP ✅ |
📌 This is why AWS recommends Multi-AZ
🧠 VERY IMPORTANT INTERVIEW POINTS
✔ Multi-AZ ≠ Auto Scaling ✔ Multi-AZ ≠ Load Balancer ✔ Multi-AZ = Design choice ✔ HA requires more than one AZ
🧠 INTERVIEW-READY ANSWER
A Multi-AZ architecture deploys EC2 instances across multiple Availability Zones within a region to ensure high availability and fault tolerance. If one AZ fails, traffic can be served from another AZ.
⚠️ COMMON MISTAKES
❌ Launching both EC2s in same AZ ❌ Assuming region = AZ ❌ Thinking Multi-AZ happens automatically
✅ LAB 16 TASK CHECKLIST
✔ Identified AZ of EC2 ✔ Launched second EC2 in different AZ ✔ Installed Apache on second EC2 ✔ Tested both independently ✔ Understood HA concept
🧪 EC2 HANDS-ON – LAB 17
👉 Application Load Balancer (ALB) – Distribute Traffic Across AZs
🎯 Objective of LAB 17
By the end of this lab, you will:
- Create an Application Load Balancer
- Route traffic to multiple EC2s
- Understand Target Groups & Health Checks
- Achieve true High Availability
- Be 100% interview-ready
🧠 FIRST: What is a Load Balancer? (Simple Words)
A Load Balancer:
- Receives traffic from users
- Distributes it across multiple EC2 instances
- Prevents overload & downtime
Think like:
Load Balancer = Traffic police 🚦
🧠 What is ALB?
Application Load Balancer (ALB):
-
Works at Layer 7 (HTTP/HTTPS)
-
Routes based on:
- URL path
- Host name
-
Supports Auto Scaling
ALB is part of Amazon Web Services → Elastic Load Balancing
🧠 ARCHITECTURE YOU ARE BUILDING
User
 ↓
Application Load Balancer
 ↓            ↓
EC2 (AZ-A)   EC2 (AZ-B)
🔹 STEP 1: Create Target Group
Target Group = Group of EC2s ALB sends traffic to
- AWS Console → EC2
- Left menu → Target Groups
- Click Create target group
Configure:
- Target type → Instances
- Name:
tg-ec2-hands-on
- Protocol → HTTP
- Port → 80
- VPC → your VPC
- Health check path:
/
Click Next
🔹 STEP 2: Register EC2 Instances
-
Select BOTH EC2 instances:
ec2-hands-on-1ec2-hands-on-az2
-
Click Include as pending
-
Click Create target group
🔹 STEP 3: Create Application Load Balancer
- EC2 → Load Balancers
- Click Create Load Balancer
- Select Application Load Balancer
Basic Configuration
- Name:
alb-ec2-hands-on
- Scheme → Internet-facing
- IP address type → IPv4
| Feature | Internet-facing | Internal |
|---|---|---|
| Accessible from internet | ✅ Yes | ❌ No |
| IP type | Public IPs | Private IPs |
| Subnet type | Public subnet | Private subnet |
| Common use | Websites, APIs | Backend services |
| DNS resolves to | Public IPs | Private IPs |
Network Mapping (IMPORTANT)
-
VPC → your VPC
-
Select at least 2 AZs
- ap-south-1a
- ap-south-1b
📌 ALB must be Multi-AZ
Security Group
-
Create new SG:
- HTTP (80) → Anywhere
-
Name:
alb-sg
Listener & Routing
- Listener → HTTP : 80
- Default action → Forward to:
tg-ec2-hands-on
Click Create load balancer
🔹 STEP 4: Wait for ALB to Become Active
Status:
Provisioning → Active
Copy:
DNS name
Example:
alb-ec2-hands-on-123.ap-south-1.elb.amazonaws.com
🔹 STEP 5: Test Load Balancer (FUN PART 🎉)
Open browser:
http://ALB_DNS_NAME
Refresh multiple times 🔄
You should see:
- Sometimes: Hello from AZ-1
- Sometimes: Hello from AZ-2
✅ Traffic is distributed
🔹 STEP 6: Health Check Verification
- EC2 → Target Groups
- Select
tg-ec2-hands-on - Check Targets
Both instances should be:
Healthy
🔹 STEP 7: FAILURE TEST (VERY IMPORTANT)
Stop ONE EC2 instance:
- Stop
ec2-hands-on-az2
Now refresh ALB URL again 👇
🟢 Website STILL works 📌 Traffic goes only to healthy EC2
👉 THIS IS HIGH AVAILABILITY
🧠 INTERVIEW-READY ANSWER
An Application Load Balancer operates at Layer 7 and distributes HTTP/HTTPS traffic across multiple targets in different Availability Zones. It uses health checks to route traffic only to healthy instances, ensuring high availability.
🧠 VERY IMPORTANT INTERVIEW POINTS
✔ ALB is regional ✔ ALB is Multi-AZ by default ✔ ALB uses Target Groups ✔ ALB performs health checks ✔ ALB does NOT host applications
⚠️ COMMON MISTAKES
❌ Not opening HTTP in EC2 SG ❌ Not opening HTTP in ALB SG ❌ Registering wrong instances ❌ Using only one AZ
✅ LAB 17 TASK CHECKLIST
✔ Created Target Group ✔ Registered EC2s ✔ Created ALB ✔ Verified traffic distribution ✔ Tested failure scenario
🧪 EC2 HANDS-ON – LAB 18
👉 Target Groups & Health Checks (Deep Dive + Failure Control)

🎯 Objective of LAB 18
By the end of this lab, you will:
- Fully understand Target Groups
- Customize Health Checks
- See how instances become Healthy / Unhealthy
- Control traffic without stopping EC2
- Be interview + production ready
🧠 FIRST: What is a Target Group? (Simple Words)
A Target Group:
-
Is a logical group of backend resources
-
ALB sends traffic only to healthy targets
-
Can contain:
- EC2 instances
- IP addresses
- Lambda (not now)
Think like:
Target Group = Team of workers 👷 ALB = Manager who sends work only to active workers
🧠 VERY IMPORTANT CONCEPT
ALB never sends traffic directly to EC2 It sends traffic via Target Groups
📌 This gives:
- Flexibility
- Health control
- Scaling support
🔹 STEP 1: Open Target Group Settings
- EC2 Console → Target Groups
- Select:
tg-ec2-hands-on
- Go to Health checks tab
- Click Edit
🔹 STEP 2: Understand Health Check Settings
Default values (important):
| Setting | Meaning |
|---|---|
| Protocol | HTTP |
| Path | / |
| Port | traffic port (80) |
| Healthy threshold | 5 |
| Unhealthy threshold | 2 |
| Timeout | 5 sec |
| Interval | 30 sec |
📌 ALB checks:
http://EC2-IP:80/
If it fails → instance marked Unhealthy
🔹 STEP 3: CREATE A CUSTOM HEALTH CHECK PAGE (Hands-On)
SSH into EC2 in AZ-A:
ssh -i ec2-key-hands-on.pem ec2-user@EC2_A_IP
Create health page:
echo "OK" | sudo tee /var/www/html/health
Repeat same on EC2 in AZ-B.
🔹 STEP 4: Update Target Group Health Check Path
Back to Target Group → Health checks → Edit
Change:
Path: /health
Save changes
⏳ Wait ~1 minute
🔹 STEP 5: Verify Health Status
Go to: Target Groups → Targets
You should see:
Healthy
📌 Health is now checked via /health
🔹 STEP 6: BREAK ONE INSTANCE (NO STOP)
SSH into EC2-A:
sudo rm /var/www/html/health
🔹 STEP 7: Observe ALB Behavior (CRITICAL)
Wait ~1 minute
Now check: Target Groups → Targets
EC2-A status:
Unhealthy
EC2-B:
Healthy
🔹 STEP 8: Test in Browser
Open:
http://ALB_DNS_NAME
🟢 Website STILL works 📌 Traffic goes only to healthy EC2
👉 This is zero-downtime protection
🔹 STEP 9: FIX THE INSTANCE
On EC2-A:
echo "OK" | sudo tee /var/www/html/health
Wait ~1 minute
Status becomes:
Healthy
Traffic resumes automatically
🧠 VERY IMPORTANT INTERVIEW POINTS
✔ Health checks prevent bad traffic ✔ EC2 can be running but unhealthy ✔ ALB removes unhealthy targets automatically ✔ No manual intervention needed
🧠 INTERVIEW-READY ANSWER
Target Groups define the backend resources for a load balancer, and health checks continuously monitor the availability of each target. The load balancer routes traffic only to healthy targets, ensuring fault tolerance and zero downtime.
⚠️ COMMON MISTAKES
❌ Wrong health check path ❌ App returns 404 / 500 ❌ Health check port blocked in SG ❌ Assuming “running” means “healthy”
✅ LAB 18 TASK CHECKLIST
✔ Understood Target Groups ✔ Created custom health endpoint ✔ Modified health check path ✔ Forced unhealthy state ✔ Observed ALB traffic control
🧪 EC2 HANDS-ON – LAB 19
👉 Auto Scaling Group (ASG) – Automatically Scale EC2
🎯 Objective of LAB 19
By the end of this lab, you will:
- Understand what Auto Scaling is
- Create an Auto Scaling Group
- Automatically add/remove EC2 instances
- Attach ASG to Application Load Balancer
- Be 100% interview + real-world ready
🧠 FIRST: What is Auto Scaling? (Very Simple)
Auto Scaling:
-
Automatically launches EC2 instances
-
Automatically terminates EC2 instances
-
Based on:
- Load (CPU)
- Health
- Capacity rules
Think like:
Auto Scaling = Smart system that hires & fires workers automatically 🤖
🧠 WHY Auto Scaling is IMPORTANT?
Without Auto Scaling:
- High traffic → app crashes ❌
- Low traffic → money wasted ❌
With Auto Scaling:
- High traffic → more EC2s ✅
- Low traffic → fewer EC2s ✅
👉 Performance + Cost optimization
🧠 ARCHITECTURE WE ARE BUILDING
Users
 ↓
Application Load Balancer
 ↓
Auto Scaling Group
 ↓        ↓        ↓
EC2 (AZ-A) EC2 (AZ-B) EC2 (AZ-C)
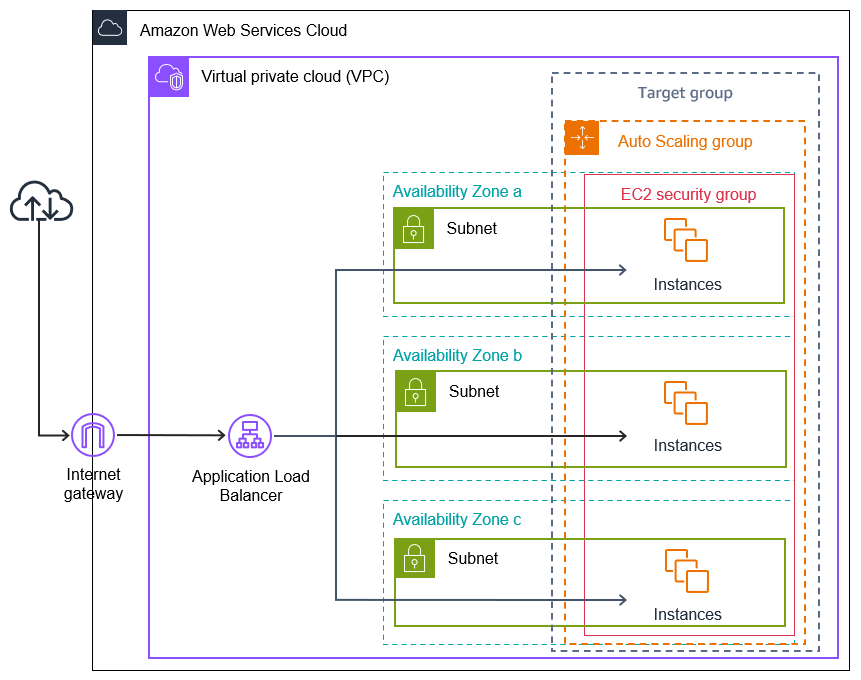
🔹 STEP 1: Create Launch Template (MOST IMPORTANT)
Auto Scaling uses a Launch Template to create EC2s.
Go to:
EC2 → Launch Templates → Create launch template
Configure Launch Template
Launch template name
lt-ec2-hands-on
AMI
- Select your custom AMI:
ec2-golden-ami-v1
📌 This ensures:
- Apache already installed
- Website ready instantly
Instance type
t2.micro
Key pair
ec2-key-hands-on
Network settings
-
Do NOT select subnet here
-
Security group:
- SSH (22) → My IP
- HTTP (80) → ALB SG (recommended)
📌 EC2 should accept traffic only from ALB
Advanced details
- Leave empty (no user data now)
Click Create launch template
🔹 STEP 2: Create Auto Scaling Group
- Go to Auto Scaling Groups
- Click Create Auto Scaling group
Basic Settings
- Name:
asg-ec2-hands-on
- Launch template:
lt-ec2-hands-on
Click Next
Network Settings (VERY IMPORTANT)
-
VPC → your VPC
-
Subnets → select at least 2 AZs
- ap-south-1a
- ap-south-1b
📌 This makes ASG Multi-AZ
Attach Load Balancer
- Select:
Attach to an existing load balancer
- Choose:
Application Load Balancer
- Select target group:
tg-ec2-hands-on
Click Next
🔹 STEP 3: Configure Group Size
Set:
- Desired capacity → 2
- Minimum capacity → 1
- Maximum capacity → 3
📌 Meaning:
- At least 1 EC2 always running
- Normally 2 EC2s
- Max 3 during traffic spike
🔹 STEP 4: Configure Scaling Policy
Choose:
Target tracking scaling policy
Metric:
Average CPU utilization
Target value:
50%
📌 If CPU > 50% → scale OUT 📌 If CPU < 50% → scale IN
Click Next → Create Auto Scaling group
🔹 STEP 5: VERIFY ASG CREATION
Go to:
Auto Scaling Groups → asg-ec2-hands-on
You should see:
- 2 EC2 instances launching automatically
📌 You did NOT manually create them!
🔹 STEP 6: VERIFY ALB INTEGRATION
-
Go to Target Groups
-
Open
tg-ec2-hands-on -
Targets → You’ll see:
- ASG-created EC2s
- Status = Healthy
🔹 STEP 7: TEST AUTO SCALING (CONCEPTUAL + OPTIONAL)
To simulate load:
sudo yum install stress -y
stress --cpu 2
📌 CPU goes high → ASG launches new EC2
(We can skip actual stress to save free tier)
you can also stop one EC2 to see ASG replace it. for that just terminate one of the ASG EC2s from console.
🧠 VERY IMPORTANT INTERVIEW POINTS
✔ ASG uses Launch Template ✔ ASG is Multi-AZ ✔ ASG replaces unhealthy EC2s ✔ ASG works with ALB ✔ ASG = High Availability + Scalability
🧠 INTERVIEW-READY ANSWER
An Auto Scaling Group automatically adjusts the number of EC2 instances based on demand and health checks. It ensures high availability, fault tolerance, and cost efficiency by scaling out during high load and scaling in during low usage.
⚠️ COMMON MISTAKES
❌ Using default AMI instead of Golden AMI ❌ Single AZ ASG ❌ Wrong security group (ALB traffic blocked) ❌ No scaling policy
✅ LAB 19 TASK CHECKLIST
✔ Created Launch Template ✔ Created Auto Scaling Group ✔ Multi-AZ configuration ✔ Integrated with ALB ✔ Understood scaling logic
🧪 EC2 HANDS-ON – LAB 20
👉 High Availability EC2 Architecture (End-to-End Design)

🎯 Objective of LAB 20
By the end of this lab, you will:
- Understand complete HA EC2 architecture
- Know how each component works together
- Be able to design & explain production systems
- Be interview + real-world ready
🧠 COMPLETE ARCHITECTURE (WHAT YOU BUILT)
Users
 ↓
Route 53 (DNS)
 ↓
Application Load Balancer (Multi-AZ)
 ↓
Auto Scaling Group
 ↓        ↓        ↓
EC2 (AZ-A) EC2 (AZ-B) EC2 (AZ-C)
 ↓
EBS (Persistent Storage)
🧠 COMPONENT-BY-COMPONENT BREAKDOWN
🔹 DNS – Amazon Route 53
- Maps domain → ALB
- Health checks (optional)
- Highly available globally
🔹 Application Load Balancer
- Internet-facing
- Distributes traffic
- Health checks targets
- Multi-AZ by default
🔹 Auto Scaling Group
- Maintains desired EC2 count
- Scales in/out automatically
- Replaces unhealthy EC2s
- Uses Launch Template + Golden AMI
🔹 EC2 Instances
- Stateless compute layer
- No data stored locally
- Created automatically
🔹 EBS
- Persistent storage
- Independent of EC2 lifecycle
- Used for logs / app data
🔹 FAILURE SCENARIOS (CRITICAL THINKING)
Scenario 1: EC2 Failure ❌
- ASG launches new EC2 automatically
- ALB routes traffic to healthy targets
Scenario 2: AZ Failure ❌
- ALB routes traffic to other AZs
- ASG launches instances in healthy AZs
Scenario 3: Traffic Spike 🚀
- CPU increases
- ASG scales out automatically
- Performance maintained
Scenario 4: Traffic Drop 📉
- ASG scales in
- Cost optimized
🧠 WHY THIS ARCHITECTURE IS PRODUCTION-READY
✔ No single point of failure ✔ Horizontally scalable ✔ Cost efficient ✔ Secure & resilient ✔ Fully automated
🧠 INTERVIEW DESIGN ANSWER (GOLD)
I would design a highly available EC2 architecture using Route 53 for DNS, an internet-facing Application Load Balancer, Auto Scaling Groups across multiple Availability Zones, and EC2 instances launched from a Golden AMI. This ensures fault tolerance, scalability, and zero downtime.
🧠 COMMON INTERVIEW FOLLOW-UP QUESTIONS
| Question | Answer |
|---|---|
| Single EC2 down? | ASG replaces |
| AZ down? | ALB routes elsewhere |
| Scale during traffic? | ASG |
| Static IP needed? | ALB DNS / Route 53 |
| Data persistence? | EBS / RDS |
🏁 PHASE COMPLETED 🎉
You have completed: ✅ Core EC2 ✅ Storage ✅ Networking ✅ Load Balancing ✅ Auto Scaling ✅ High Availability
🧪 EC2 HANDS-ON – LAB 21
👉 Amazon CloudWatch (Monitoring, Metrics & Alarms)

🎯 Objective of LAB 21
By the end of this lab, you will:
- Understand what CloudWatch is
- Monitor EC2 metrics (CPU, Network, Disk)
- Create a CloudWatch Alarm
- Trigger an alarm practically
- Be interview + production ready
🧠 FIRST: What is CloudWatch? (Very Simple)
CloudWatch is:
- AWS monitoring service
- Collects metrics, logs, events
- Helps you see & react to problems
Think like:
CloudWatch = CCTV + Health monitor for AWS resources 📊
🧠 What CloudWatch Does for EC2
CloudWatch can: ✔ Monitor CPU usage ✔ Monitor network traffic ✔ Trigger alarms ✔ Help Auto Scaling ✔ Reduce downtime
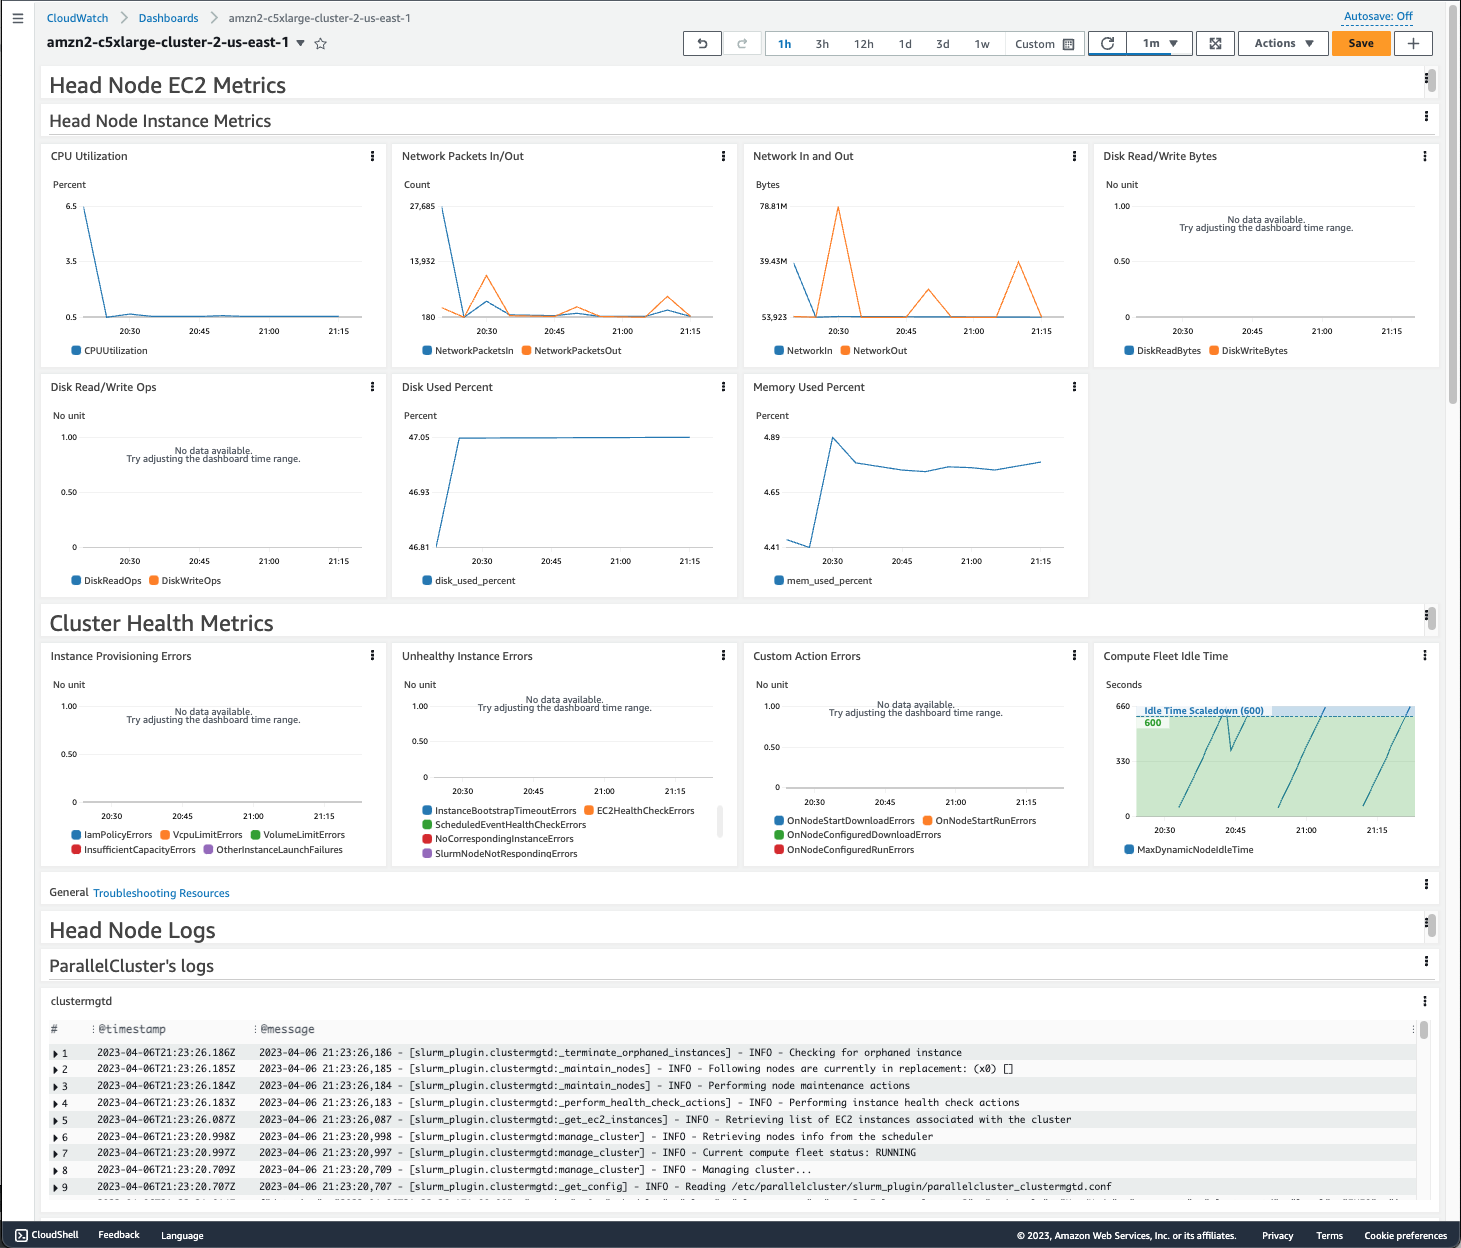
🔹 STEP 1: Open CloudWatch
- AWS Console
- Search CloudWatch
- Open CloudWatch Dashboard
🔹 STEP 2: View EC2 Metrics
- Left menu → Metrics
- Click EC2
- Click Per-Instance Metrics
- Select one EC2 from ASG or
ec2-hands-on-1
You’ll see metrics like:
- CPUUtilization
- NetworkIn
- NetworkOut
- DiskReadOps
📌 These are real-time performance data
🔹 STEP 3: View CPU Utilization Graph
- Select CPUUtilization
- Click Graphed metrics
You’ll see:
- Time on X-axis
- CPU % on Y-axis
📌 This is what ASG uses for scaling
🔹 STEP 4: Create a CloudWatch Alarm (IMPORTANT)
Now we create an alarm on CPU usage.
- Select CPUUtilization
- Click Create alarm
Alarm Configuration
Metric
- CPUUtilization
Condition
- Threshold type → Static
- Whenever CPUUtilization Greater than
70%
Notification
- Alarm state trigger → In alarm
📌 For now:
- Choose Create new SNS topic
- Email → your email
- Confirm subscription from email (IMPORTANT)
Alarm Name
ec2-high-cpu-alarm
Click Create alarm
🔹 STEP 5: Verify Alarm Status
Go to: CloudWatch → Alarms
Status initially:
OK
📌 Alarm watches EC2 continuously
🔹 STEP 6: Trigger Alarm (Hands-On)
SSH into EC2:
ssh -i ec2-key-hands-on.pem ec2-user@EC2_PUBLIC_IP
Install stress tool:
sudo yum install stress -y
Run stress:
stress --cpu 2
📌 This increases CPU usage
🔹 STEP 7: Observe Alarm State Change
Wait ~1–2 minutes
Alarm status changes:
OK → ALARM
📧 You receive email alert
🎉 Monitoring + alerting works
🔹 STEP 8: Stop Stress Test
Press:
CTRL + C
After few minutes:
ALARM → OK
🧠 VERY IMPORTANT INTERVIEW POINTS
✔ CloudWatch metrics are automatic ✔ Alarms trigger actions or notifications ✔ ASG uses CloudWatch metrics ✔ Default EC2 metrics are every 5 minutes ✔ Detailed monitoring = 1 minute
🧠 INTERVIEW-READY ANSWER
Amazon CloudWatch is a monitoring service that collects metrics, logs, and events from AWS resources. It enables real-time visibility, alarm-based notifications, and automated actions such as Auto Scaling.
⚠️ COMMON MISTAKES
❌ Forgetting to confirm SNS email ❌ Expecting disk usage without agent ❌ Setting wrong threshold ❌ Monitoring wrong instance
✅ LAB 21 TASK CHECKLIST
✔ Viewed EC2 metrics ✔ Understood CPU graph ✔ Created CloudWatch alarm ✔ Triggered alarm practically ✔ Received notification
🧪 EC2 HANDS-ON – LAB 22
👉 CloudWatch Alarms + Auto Scaling (Automatic Scale Out & In)
🎯 Objective of LAB 22
By the end of this lab, you will:
- Connect CloudWatch → Auto Scaling
- Create scale-out & scale-in alarms
- See EC2 instances launch automatically
- Understand how AWS self-heals
- Be interview + real-world ready
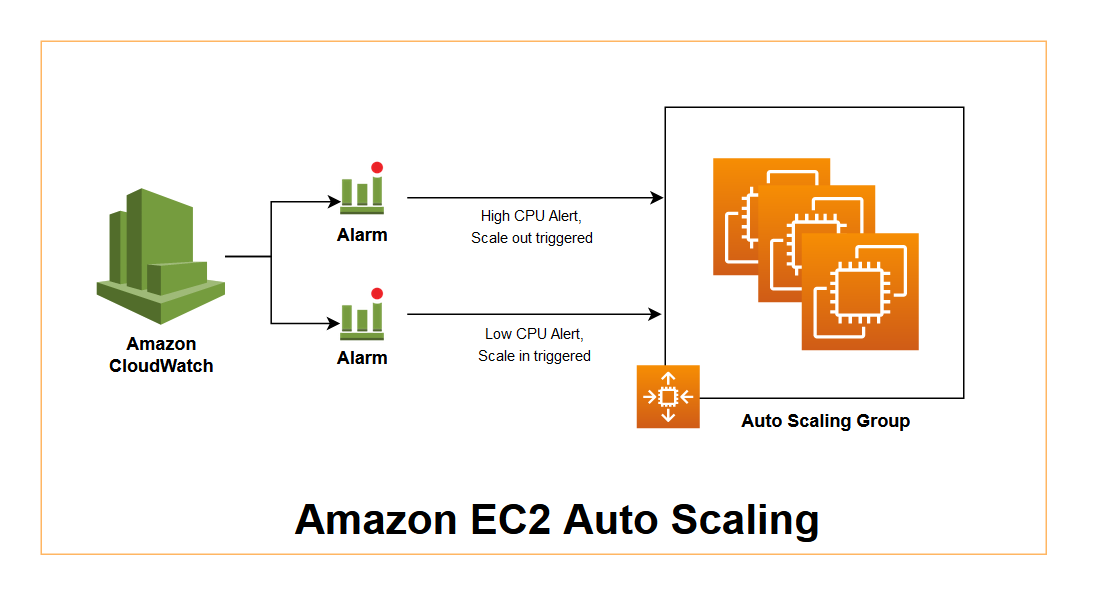
🧠 FIRST: How This Works (Simple Flow)
High CPU
 ↓
CloudWatch Alarm
 ↓
Auto Scaling Policy
 ↓
New EC2 launched
And reverse for scale-in.
Think like:
CloudWatch = Sensor 📈 Auto Scaling = Action 🤖
🧠 IMPORTANT CONCEPT
- CloudWatch detects
- Auto Scaling reacts
- You do nothing manually
🔹 STEP 1: Open Your Auto Scaling Group
- EC2 Console → Auto Scaling Groups
- Select:
asg-ec2-hands-on
- Open Automatic scaling tab
You will see:
- Existing Target tracking policy (CPU 50%)
📌 Target tracking already uses CloudWatch internally Now we’ll explicitly see alarm behavior
🔹 STEP 2: View Auto-Created CloudWatch Alarms
- Open CloudWatch
- Go to Alarms
- You’ll see alarms like:
TargetTracking-asg-ec2-hands-on-High-CPU
TargetTracking-asg-ec2-hands-on-Low-CPU
📌 These were created automatically by ASG
🔹 STEP 3: Understand These Alarms
High CPU Alarm
- Trigger: CPU > 50%
- Action: Scale OUT
- Adds EC2 instance
Low CPU Alarm
- Trigger: CPU < 50%
- Action: Scale IN
- Removes EC2 instance
👉 This is closed-loop automation
🔹 STEP 4: Observe Current Capacity
Go back to ASG → Details
Check:
- Desired: 2
- Min: 1
- Max: 3
📌 Currently running EC2 = 2
🔹 STEP 5: Trigger SCALE OUT (Hands-On)
SSH into one ASG EC2 (any):
ssh -i ec2-key-hands-on.pem ec2-user@ASG_EC2_PUBLIC_IP
Install stress:
sudo yum install stress -y
Run:
stress --cpu 2
🔹 STEP 6: Observe Scaling Activity (IMPORTANT)
- ASG → Activity
- You’ll see:
Launching a new EC2 instance
Wait 2–5 minutes
Now:
- EC2 count becomes 3
- New EC2 automatically registered in Target Group
- ALB sends traffic to it
🎉 AUTO SCALE OUT SUCCESS
🔹 STEP 7: Verify via Target Group
- EC2 → Target Groups
- Open
tg-ec2-hands-on - Targets → You’ll see 3 healthy instances
🔹 STEP 8: Trigger SCALE IN
Stop stress:
CTRL + C
Wait few minutes
ASG activity:
Terminating EC2 instance
Now EC2 count → 2
📌 Scale-in never goes below minimum capacity
🧠 VERY IMPORTANT INTERVIEW POINTS
✔ Auto Scaling uses CloudWatch metrics ✔ Alarms can trigger scale out/in ✔ Scaling is automatic & continuous ✔ No human action required ✔ Prevents over-provisioning
🧠 INTERVIEW-READY ANSWER
CloudWatch alarms monitor EC2 metrics such as CPU utilization and trigger Auto Scaling policies to automatically scale out or scale in instances, ensuring performance and cost efficiency.
⚠️ COMMON MISTAKES
❌ Min capacity = 0 (downtime risk) ❌ Wrong metric selection ❌ Expecting instant scaling (it’s gradual) ❌ Forgetting cooldown periods
✅ LAB 22 TASK CHECKLIST
✔ Viewed ASG-created alarms ✔ Triggered scale-out ✔ Observed new EC2 launch ✔ Verified via Target Group ✔ Observed scale-in
🧪 EC2 HANDS-ON – LAB 23
👉 EC2 Logs & Troubleshooting (CloudWatch Logs + Real Failures)

🎯 Objective of LAB 23
By the end of this lab, you will:
- Understand where EC2 logs live
- Send EC2 logs to CloudWatch
- Debug real website failures
- Know production troubleshooting flow
- Be interview + on-call ready
🧠 FIRST: Why Logs Are CRITICAL
Metrics tell you something is wrong Logs tell you WHY it is wrong
Think like:
Metrics = Fever 🌡️ Logs = Doctor report 🩺
🧠 TYPES OF LOGS YOU MUST KNOW
1️⃣ System Logs
- OS boot issues
- Kernel problems
2️⃣ Application Logs
- Apache / Nginx
- App errors
3️⃣ Cloud Logs
- Centralized in CloudWatch
- Used for monitoring & alerting
🔹 STEP 1: Check EC2 SYSTEM LOG (Console Level)
- EC2 → Instances
- Select any EC2
- Actions → Monitor and troubleshoot
- Click Get system log
📌 Shows:
- Boot messages
- Startup failures
✅ Used when EC2 won’t start
🔹 STEP 2: Apache Logs (INSIDE EC2)
SSH into EC2:
ssh -i ec2-key-hands-on.pem ec2-user@EC2_PUBLIC_IP
Apache log locations:
/var/log/httpd/access_log
/var/log/httpd/error_log
View logs:
sudo tail -f /var/log/httpd/access_log
📌 Shows:
- Requests coming to server
🔹 STEP 3: Simulate an ERROR (Hands-On)
Break Apache config (safe test):
sudo chmod 000 /var/www/html
Now open website in browser ❌ It will fail
Check error log:
sudo tail /var/log/httpd/error_log
You’ll see permission denied errors
👉 This is real troubleshooting
🔹 STEP 4: FIX the Issue
sudo chmod 755 /var/www/html
sudo systemctl restart httpd
Refresh browser → 🟢 Works again
🧠 LESSON
✔ Website down ≠ EC2 down ✔ Logs tell exact cause ✔ Restart without checking logs = BAD practice
🔹 STEP 5: Send EC2 Logs to CloudWatch (IMPORTANT)
Now we centralize logs using CloudWatch Agent.
Install CloudWatch Agent
sudo yum install amazon-cloudwatch-agent -y
📌 This agent sends logs → CloudWatch
Create Agent Config File
sudo nano /opt/aws/amazon-cloudwatch-agent/bin/config.json
Paste:
{
  "logs": {
    "logs_collected": {
      "files": {
        "collect_list": [
          {
            "file_path": "/var/log/httpd/error_log",
            "log_group_name": "ec2-apache-error-log",
            "log_stream_name": "{instance_id}"
          }
        ]
      }
    }
  }
}
Save & exit
Start CloudWatch Agent
sudo /opt/aws/amazon-cloudwatch-agent/bin/amazon-cloudwatch-agent-ctl \
-a fetch-config \
-m ec2 \
-c file:/opt/aws/amazon-cloudwatch-agent/bin/config.json \
-s
📌 This command:
- Reads config
- Starts agent
- Pushes logs to CloudWatch
🔹 STEP 6: View Logs in CloudWatch
- Open CloudWatch
- Go to Logs → Log groups
- Open:
ec2-apache-error-log
🎉 You’ll see Apache logs without SSH
🧠 REAL-WORLD BENEFITS
✔ Debug without server access ✔ Centralized logs ✔ Works with ASG (instances come & go) ✔ Required for compliance & audits
🧠 INTERVIEW-READY ANSWER
EC2 troubleshooting involves analyzing system logs, application logs, and CloudWatch Logs. Centralizing logs in CloudWatch enables faster debugging, monitoring, and troubleshooting across scalable environments.
⚠️ COMMON MISTAKES
❌ Restarting services blindly ❌ Not checking error logs ❌ No centralized logging ❌ SSH-only debugging
✅ LAB 23 TASK CHECKLIST
✔ Viewed system logs ✔ Checked Apache logs ✔ Simulated real error ✔ Fixed issue using logs ✔ Sent logs to CloudWatch
🧪 EC2 HANDS-ON – LAB 24
👉 IAM Roles for EC2 (Secure AWS Access WITHOUT Access Keys)
🎯 Objective of LAB 24
By the end of this lab, you will:
- Understand why access keys are dangerous
- Create an IAM Role
- Attach the role to an EC2 instance
- Access AWS services without access keys
- Be 100% interview + production ready
🧠 FIRST: Why NOT Use Access Keys on EC2?
If you put Access Key + Secret Key inside EC2: ❌ Keys can be stolen ❌ Keys can be leaked in GitHub ❌ Manual rotation required ❌ Security risk
👉 AWS Best Practice: ✔ Use IAM Roles
🧠 What is an IAM Role?
An IAM Role:
- Is an identity for AWS services
- Provides temporary credentials
- Automatically rotated by AWS
- Attached directly to EC2
Think like:
IAM Role = Temporary ID card 🎫 EC2 uses it automatically
🔹 IAM SERVICE (Important to Know)
IAM belongs to Amazon Web Services
IAM = Identity and Access Management
🧠 WHAT WE WILL DO IN THIS LAB
We will: 1️⃣ Create IAM Role 2️⃣ Attach S3 read access 3️⃣ Attach role to EC2 4️⃣ Access S3 without keys
🔹 STEP 1: Create IAM Role
- AWS Console → Search IAM
- Click Roles
- Click Create role
Trusted Entity
- Select AWS service
- Use case → EC2
- Click Next
📌 This means: EC2 is allowed to assume this role
🔹 STEP 2: Attach Permission Policy
Search & select:
AmazonS3ReadOnlyAccess
Click Next
📌 This policy allows:
- List buckets
- Read objects
- NO delete access
🔹 STEP 3: Name the Role
Role name:
ec2-s3-read-role
Click Create role
🎉 IAM Role created
🔹 STEP 4: Attach IAM Role to EC2
- EC2 → Instances
- Select:
ec2-hands-on-1
- Actions → Security
- Click Modify IAM role
- Select:
ec2-s3-read-role
- Save
📌 Role attached without reboot
🔹 STEP 5: VERIFY ACCESS (NO ACCESS KEYS)
SSH into EC2:
ssh -i ec2-key-hands-on.pem ec2-user@ELASTIC_IP
Run:
aws s3 ls
🎉 You should see S3 buckets list
📌 No access key 📌 No secret key 📌 Fully secure
🔹 STEP 6: PROVE THERE ARE NO KEYS
Run:
cat ~/.aws/credentials
Output:
No such file or directory
✅ Proof: IAM Role is working
🧠 HOW THIS WORKS INTERNALLY (INTERVIEW GOLD)
- EC2 requests credentials from Metadata Service
- IAM provides temporary credentials
- Credentials auto-expire & rotate
🧠 INTERVIEW-READY ANSWER
IAM Roles provide secure, temporary credentials to EC2 instances, eliminating the need for hard-coded access keys. AWS automatically rotates these credentials, making IAM Roles the recommended and secure way to grant permissions to EC2.
⚠️ COMMON MISTAKES
❌ Using access keys on EC2 ❌ Over-permissioned roles ❌ One role for everything ❌ Not rotating credentials (keys)
✅ LAB 24 TASK CHECKLIST
✔ Created IAM Role ✔ Attached S3 Read policy ✔ Attached role to EC2 ✔ Accessed S3 without keys ✔ Understood security flow
🧪 EC2 HANDS-ON – LAB 25
👉 EC2 Session Manager (Login WITHOUT SSH & Key Pair)
🎯 Objective of LAB 25
By the end of this lab, you will:
- Understand what Session Manager is
- Access EC2 without SSH
- Remove dependency on key pairs
- Learn enterprise-grade secure access
- Be interview + production ready
🧠 FIRST: What is Session Manager?
Session Manager is part of AWS Systems Manager
It allows you to: ✔ Connect to EC2 via AWS Console ✔ No SSH (port 22 not needed) ✔ No key pair ✔ Fully logged & auditable
Think like:
Session Manager = Secure remote terminal via AWS 🔐
🧠 WHY Session Manager is BETTER than SSH?
| SSH | Session Manager |
|---|---|
| Needs port 22 | ❌ No ports needed |
| Needs key pair | ❌ No keys |
| Hard to audit | ✅ Fully logged |
| Security risk | ✅ Very secure |
👉 AWS RECOMMENDS Session Manager
🧠 PREREQUISITES (VERY IMPORTANT)
To use Session Manager, EC2 must have:
✔ SSM Agent installed ✔ IAM Role attached with SSM permissions ✔ Internet access (or VPC endpoints)
Good news 🎉 Amazon Linux already has SSM Agent installed
🔹 STEP 1: Attach SSM IAM Role to EC2
We’ll extend the role you already used.
Open IAM Role
- IAM → Roles
- Open:
ec2-s3-read-role
Attach SSM Policy
- Click Add permissions
- Attach policy:
AmazonSSMManagedInstanceCore
- Save
📌 This policy allows:
- Session Manager
- Run Command
- Patch Manager
🔹 STEP 2: Verify Role Attached to EC2
- EC2 → Instances
- Select:
ec2-hands-on-1
- Security tab → IAM role
It should show:
ec2-s3-read-role
🔹 STEP 3: Open Session Manager
- EC2 Console → Instances
- Select your instance
- Click Connect
- Choose Session Manager
- Click Connect
🎉 YOU ARE LOGGED IN
No: ❌ SSH ❌ Key pair ❌ Port 22
🔹 STEP 4: Verify Inside EC2
Inside Session Manager terminal, run:
whoami
Output:
ssm-user
📌 This user is created dynamically by SSM
Check OS:
uname -a
🔹 STEP 5: PROVE SSH is NOT Needed (Concept)
You can:
- Remove SSH rule from Security Group
- EC2 still accessible via Session Manager
📌 This is zero-attack-surface access
(Do NOT remove now — concept only)
🧠 HOW SESSION MANAGER WORKS (INTERVIEW GOLD)
- EC2 runs SSM Agent
- Agent talks to Systems Manager endpoint
- IAM Role authorizes access
- AWS Console opens secure tunnel
👉 No inbound traffic needed
🧠 INTERVIEW-READY ANSWER
EC2 Session Manager, part of AWS Systems Manager, provides secure shell access to instances without opening inbound ports or using SSH keys. It uses IAM roles and the SSM Agent, offering improved security and full auditing.
⚠️ COMMON MISTAKES
❌ No IAM role attached ❌ Missing SSM policy ❌ SSM Agent stopped ❌ No internet/VPC endpoint
✅ LAB 25 TASK CHECKLIST
✔ Added SSM policy ✔ Connected via Session Manager ✔ Logged in without SSH ✔ Understood secure access model
🏁 SECURITY ACCESS PHASE COMPLETED 🎉
You now know: ✔ SSH access ✔ Key pairs ✔ IAM Roles ✔ Session Manager (BEST PRACTICE)
🧪 EC2 HANDS-ON – LAB 26
👉 Private EC2 + Bastion Host (Enterprise-Grade Secure Access)


🎯 Objective of LAB 26
By the end of this lab, you will:
- Understand Public vs Private EC2
- Create a Private EC2 instance
- Use a Bastion Host for secure access
- Learn enterprise security design
- Be interview + production ready
🧠 FIRST: What is a Private EC2?
A Private EC2:
- Has NO public IP
- Lives in a private subnet
- Cannot be accessed from the internet directly
Think like:
Private EC2 = Office server inside company network 🏢 Not exposed to the internet 🌐❌
🧠 What is a Bastion Host?
A Bastion Host:
- Is a public EC2
- Acts as a secure entry point
- Used to access private EC2s
Think like:
Bastion = Security gate 🚧 Private EC2 = Internal room 🔐
🧠 ARCHITECTURE WE ARE BUILDING
Your Laptop
   ↓
Bastion Host (Public Subnet)
   ↓
Private EC2 (Private Subnet)
This runs inside Amazon Web Services VPC
🔹 STEP 1: Understand Your VPC Structure
Go to:
- VPC → Subnets
You’ll see:
- Public Subnet
- Private Subnet
📌 Public subnet:
- Route to Internet Gateway
📌 Private subnet:
- NO Internet Gateway route
🔹 STEP 2: Launch BASTION HOST (Public EC2)
Launch new EC2
- Name:
bastion-host
-
AMI: Amazon Linux 2023
-
Instance type: t2.micro
-
Subnet: Public Subnet
-
Auto-assign Public IP: Enabled
-
Security Group:
- SSH (22) → My IP only
Launch instance
🔹 STEP 3: Launch PRIVATE EC2
Launch another EC2
- Name:
private-ec2
-
AMI: Amazon Linux 2023
-
Instance type: t2.micro
-
Subnet: Private Subnet
-
Auto-assign Public IP: ❌ Disabled
-
Security Group:
- SSH (22) → ONLY from Bastion SG
📌 This EC2 has NO public IP
🔹 STEP 4: VERIFY PRIVATE EC2 IS NOT PUBLIC
Check EC2 details:
- Public IPv4 address → None
❌ Cannot SSH from laptop ✅ This is secure by design
🔹 STEP 5: CONNECT TO BASTION HOST
From your laptop:
ssh -i ec2-key-hands-on.pem ec2-user@BASTION_PUBLIC_IP
You are now inside the bastion host
🔹 STEP 6: COPY KEY TO BASTION (TEMPORARY)
⚠️ For learning only (not best practice)
On your laptop:
scp -i ec2-key-hands-on.pem ec2-key-hands-on.pem ec2-user@BASTION_PUBLIC_IP:/home/ec2-user/
On bastion:
chmod 400 ec2-key-hands-on.pem
🔹 STEP 7: CONNECT TO PRIVATE EC2 FROM BASTION
From inside bastion:
ssh -i ec2-key-hands-on.pem ec2-user@PRIVATE_EC2_PRIVATE_IP
🎉 You are now logged into PRIVATE EC2
🧠 VERY IMPORTANT SECURITY RULE
❌ Never expose private EC2 to internet ✔ Access only via bastion / Session Manager ✔ Bastion SSH restricted to your IP
🧠 REAL-WORLD BEST PRACTICE (INTERVIEW GOLD)
| Practice | Status |
|---|---|
| Bastion in public subnet | ✅ |
| Private EC2 no public IP | ✅ |
| SSH only via bastion | ✅ |
| IAM + Session Manager | ⭐ BEST |
👉 Modern replacement: Bastion ❌ → Session Manager ✅
🧠 INTERVIEW-READY ANSWER
A Bastion Host is a publicly accessible EC2 instance used as a secure gateway to access private EC2 instances in a VPC. Private instances have no public IP and are protected from direct internet access, improving security.
⚠️ COMMON MISTAKES
❌ Giving public IP to private EC2 ❌ Opening SSH to 0.0.0.0/0 ❌ Storing keys on bastion permanently ❌ Using bastion when Session Manager is available
✅ LAB 26 TASK CHECKLIST
✔ Understood public vs private EC2 ✔ Launched bastion host ✔ Launched private EC2 ✔ Accessed private EC2 securely ✔ Learned enterprise network design
🧪 EC2 HANDS-ON – LAB 27
👉 EC2 in Public vs Private Subnet (Traffic Flow & Internet Access)

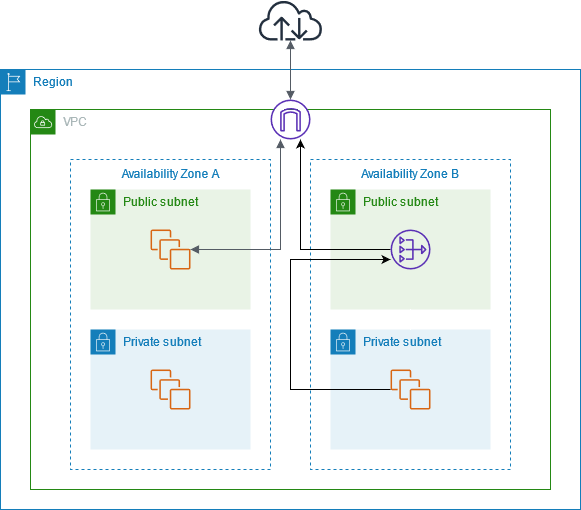

🎯 Objective of LAB 27
By the end of this lab, you will:
- Clearly understand Public vs Private Subnet
- Know why an EC2 has or doesn’t have internet
- Understand Internet Gateway (IGW) and NAT Gateway
- Be able to draw & explain traffic flow (interview-ready)
🧠 FIRST: What is a Subnet? (Simple)
A Subnet is:
- A range of IP addresses
- Inside a VPC
- Placed in one Availability Zone
Think like:
VPC = Building 🏢 Subnet = Floor 🧱
🧠 KEY RULE (MEMORIZE THIS)
❗ Subnet is NOT public or private by itself
A subnet becomes:
- Public → if its route table points to an Internet Gateway
- Private → if it does NOT point to an Internet Gateway
🔹 COMPONENTS YOU MUST KNOW
🌐 Internet Gateway (IGW)
- Allows internet ↔ VPC
- Required for public internet access
🔁 NAT Gateway
- Allows private EC2 → internet
- Blocks internet → private EC2
🔹 STEP 1: Open Your VPC Route Tables
-
AWS Console → VPC
-
Left menu → Route Tables
-
Identify:
- Public route table
- Private route table
🔹 STEP 2: Examine PUBLIC Subnet Route Table
Select public route table → Routes tab
You will see something like:
| Destination | Target |
|---|---|
| 10.0.0.0/16 | local |
| 0.0.0.0/0 | igw-xxxx |
📌 Meaning:
- Local VPC traffic → allowed
- All internet traffic → Internet Gateway
👉 This makes the subnet PUBLIC
🔹 STEP 3: Examine PRIVATE Subnet Route Table
Select private route table → Routes tab
You’ll see:
| Destination | Target |
|---|---|
| 10.0.0.0/16 | local |
📌 Meaning:
- Internal VPC traffic only
- ❌ No internet access
👉 This makes the subnet PRIVATE
🔹 STEP 4: WHY Public EC2 Has Internet
Your Bastion Host:
- In public subnet
- Has public IP
- Route → IGW
Traffic flow:
Laptop → IGW → Public EC2
Public EC2 → IGW → Internet
🔹 STEP 5: WHY Private EC2 Has NO Internet
Your private EC2:
- In private subnet
- ❌ No public IP
- ❌ No IGW route
Traffic flow:
Internet ❌→ Private EC2
✔ Secure by default
🔹 STEP 6: Give INTERNET to Private EC2 (OUTBOUND ONLY)
This is where NAT Gateway is used.
NAT Gateway flow:
Private EC2 → NAT Gateway → IGW → Internet
Internet ❌→ Private EC2
📌 Used for:
- OS updates
- Package installs
- API calls
🔹 STEP 7: REAL-WORLD ARCHITECTURE
Users
 ↓
Internet Gateway
 ↓
Public Subnet (ALB, Bastion)
 ↓
Private Subnet (EC2, App, DB)
 ↓
NAT Gateway → Internet (outbound only)
Used by Amazon Web Services best practices
🧠 INTERVIEW-READY COMPARISON TABLE
| Feature | Public Subnet | Private Subnet |
|---|---|---|
| IGW route | ✅ Yes | ❌ No |
| Public IP | ✅ Yes | ❌ No |
| Internet access | ✅ Yes | ❌ No |
| Inbound from internet | ✅ Possible | ❌ Blocked |
| Use case | ALB, Bastion | App, DB |
🧠 INTERVIEW-READY ANSWER (VERY IMPORTANT)
A public subnet has a route to an Internet Gateway, allowing internet access, while a private subnet does not. Private instances can still access the internet outbound using a NAT Gateway, without being exposed to inbound traffic.
⚠️ COMMON MISTAKES
❌ Thinking “public subnet” = public IP ❌ Attaching IGW to private subnet ❌ Exposing databases publicly ❌ Forgetting NAT for updates
✅ LAB 27 TASK CHECKLIST
✔ Inspected route tables ✔ Understood IGW role ✔ Understood NAT Gateway role ✔ Explained traffic flow clearly ✔ Interview-level clarity achieved
🧪 EC2 HANDS-ON – LAB 28
👉 Patch Management for EC2 (Automatic OS Updates – Secure & Scalable)
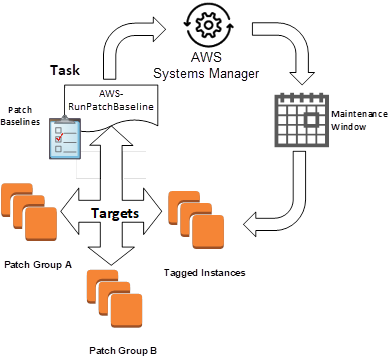


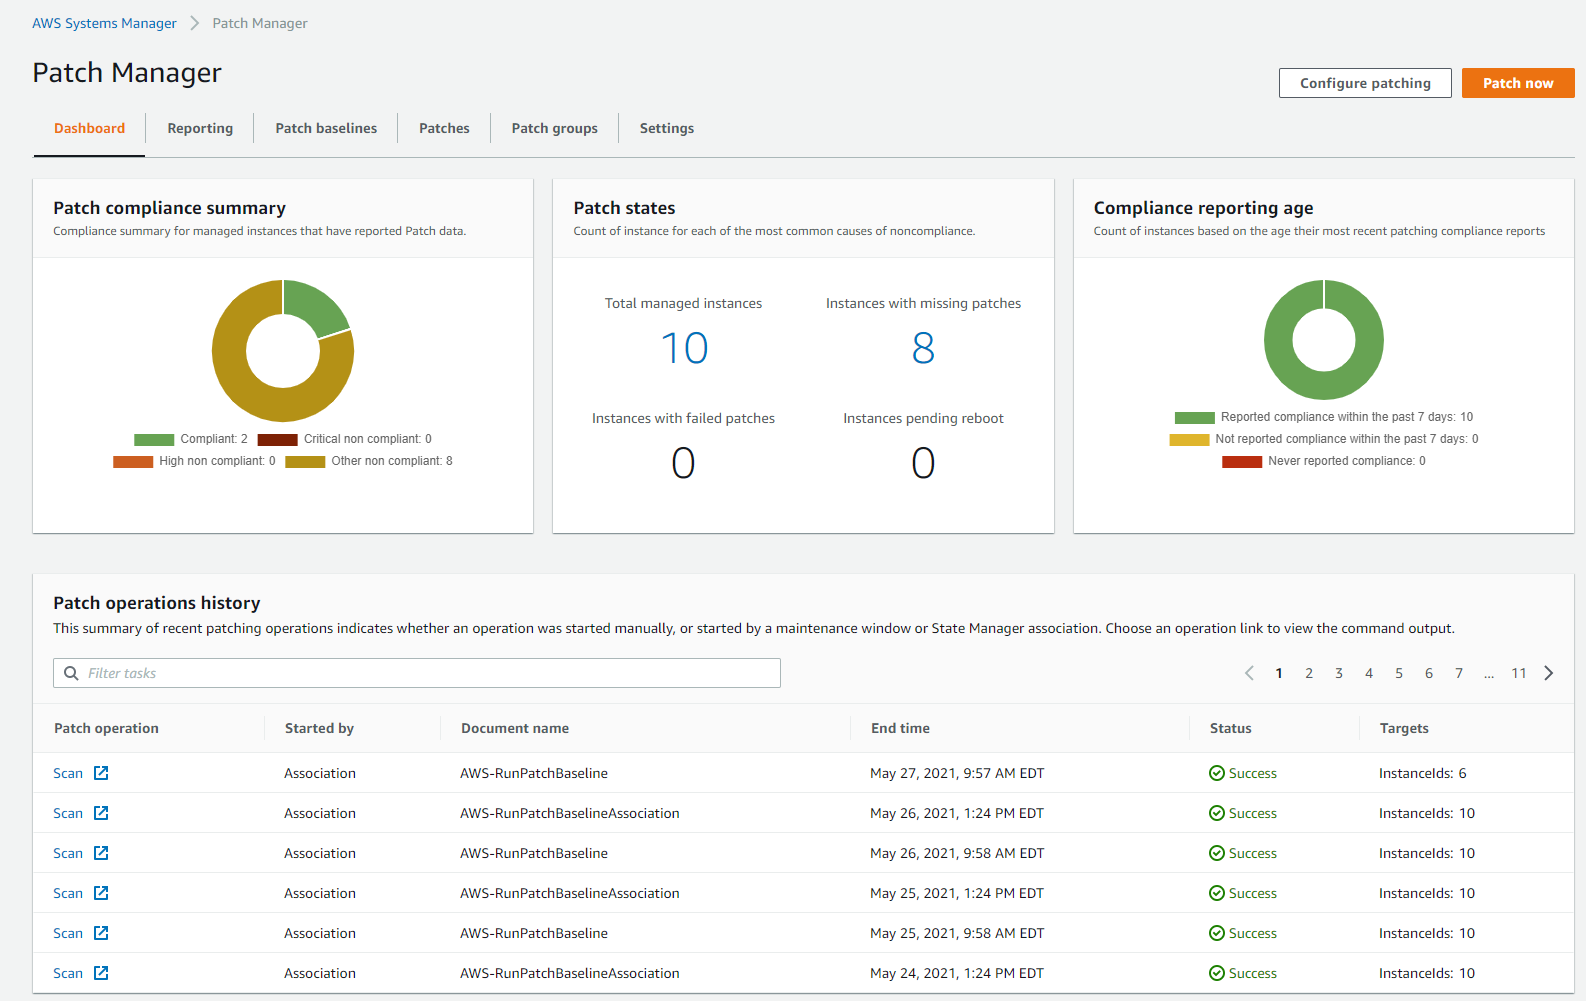
🎯 Objective of LAB 28
By the end of this lab, you will:
- Understand why patching is critical
- Use AWS Patch Manager
- Patch EC2 without SSH
- View patch compliance
- Be production + interview ready
🧠 FIRST: What is Patch Management? (Simple)
Patch Management means:
- Updating OS packages
- Fixing security vulnerabilities
- Applying bug fixes
Think like:
Patching = Regular medical check-up for servers 🩺
❌ Unpatched servers = security risk ✅ Patched servers = safe & compliant
🧠 WHICH AWS SERVICE DOES PATCHING?
Patching is handled by AWS Systems Manager (specifically Patch Manager)
🧠 WHY USE PATCH MANAGER (NOT MANUAL SSH)?
| Manual SSH | Patch Manager |
|---|---|
| Error-prone | Automated |
| No audit | Full audit |
| Not scalable | Scales to 1000s EC2 |
| Needs SSH | ❌ No SSH |
👉 Production always uses Patch Manager
🧠 PREREQUISITES (YOU ALREADY HAVE THEM ✅)
Your EC2 already has:
✔ SSM Agent
✔ IAM Role with AmazonSSMManagedInstanceCore
✔ Connectivity to SSM
So we’re ready 🎉
🔹 STEP 1: Open Patch Manager
- AWS Console → Systems Manager
- Left menu → Patch Manager
🔹 STEP 2: Check Managed Instances
- Systems Manager → Fleet Manager
- Click Managed nodes
You should see your EC2:
ec2-hands-on-1
📌 If EC2 is visible → SSM is working
🔹 STEP 3: Patch Compliance (Read-Only View)
- Systems Manager → Patch Manager
- Click Compliance
You’ll see:
- Missing patches
- Installed patches
- Compliance status
📌 This gives security visibility
🔹 STEP 4: Create Patch Baseline (Concept)
AWS provides default patch baselines:
- Amazon Linux
- Ubuntu
- Windows
📌 We’ll use default baseline (best practice)
🔹 STEP 5: Run Patch Scan (SAFE – NO CHANGES)
We’ll first SCAN, not install.
-
Patch Manager → Patches
-
Click Configure patching
-
Choose:
- Patch operation → Scan
- Instances → select your EC2
-
Run
📌 Scan:
- Checks missing patches
- Does NOT install anything
🔹 STEP 6: View Scan Results
After completion:
- Status → Success
- Compliance → Compliant / Non-compliant
📌 This is used by security teams
🔹 STEP 7: Install Patches (Conceptual – IMPORTANT)
In production:
- Patch operation → Install
- Scheduled during maintenance window
- Automatic reboot (optional)
⚠️ We won’t install now to avoid downtime But concept is VERY important
🔹 STEP 8: Maintenance Window (Concept)
A Maintenance Window:
-
Defines WHEN patching happens
-
Example:
- Sunday 2 AM – 4 AM
Used for:
- Patching
- Reboots
- Updates
📌 Zero impact on users
🧠 REAL-WORLD PATCH STRATEGY
✔ Scan daily ✔ Patch weekly ✔ Patch in maintenance window ✔ Auto reboot if needed ✔ Monitor compliance
🧠 INTERVIEW-READY ANSWER
AWS Patch Manager, part of Systems Manager, automates the process of scanning and installing OS patches on EC2 instances. It ensures security compliance without requiring SSH access and supports scheduling through maintenance windows.
⚠️ COMMON MISTAKES
❌ Manual patching via SSH ❌ No maintenance window ❌ Patching production during peak hours ❌ No compliance monitoring
✅ LAB 28 TASK CHECKLIST
✔ Opened Patch Manager ✔ Verified managed EC2 ✔ Ran patch scan ✔ Viewed compliance ✔ Understood production patching strategy
🧪 EC2 HANDS-ON – LAB 29
👉 EC2 Backup Strategy (Snapshots, AMIs & Automation)
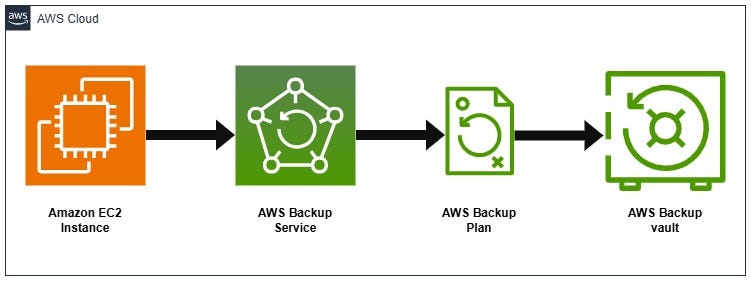


🎯 Objective of LAB 29
By the end of this lab, you will:
- Design a complete EC2 backup strategy
- Use EBS Snapshots correctly
- Use AMIs for full server backup
- Understand backup automation
- Be interview + production ready
🧠 FIRST: Why Backup is CRITICAL
Failures happen:
- Human error ❌
- AZ outage ❌
- Accidental delete ❌
- Security incident ❌
Think like:
Backup = Insurance for your data 🛡️
🧠 TYPES OF EC2 BACKUPS (VERY IMPORTANT)
1️⃣ EBS Snapshots
- Backup of data disks
- Incremental
- Fast restore
2️⃣ AMIs
- Backup of entire EC2
- OS + software + config
- Used to recreate servers
3️⃣ Automated Backups
- Scheduled
- No manual effort
- Required in production
🔹 BACKUP STRATEGY (REAL-WORLD STANDARD)
| What | Backup Method |
|---|---|
| OS + App | AMI |
| App data | EBS Snapshot |
| Logs | CloudWatch / S3 |
| DR | Cross-region copy |
🔹 STEP 1: Identify What to Back Up
For ec2-hands-on-1:
✔ Root volume → OS
✔ /data EBS → App data
✔ Config → AMI
📌 Never rely on one backup type
🔹 STEP 2: On-Demand EBS Snapshot (Recap)
- EC2 → Volumes
- Select data volume
- Actions → Create snapshot
- Name:
daily-data-backup
📌 Use before:
- App upgrade
- OS patch
- Major change
🔹 STEP 3: AMI as Full Server Backup
- EC2 → Instances
- Select
ec2-hands-on-1 - Actions → Image and templates
- Create image
Name:
ec2-backup-ami-v2
📌 This captures:
- Root EBS
- Config
- Installed software
🔹 STEP 4: AUTOMATED BACKUP (IMPORTANT CONCEPT)
In production, backups are NOT manual.
AWS provides AWS Backup to: ✔ Schedule backups ✔ Retention rules ✔ Cross-region copy ✔ Compliance reports
🔹 STEP 5: AWS Backup – How It Works (Concept)
-
Create Backup Plan
-
Define:
- Schedule (daily / weekly)
- Retention (7 days / 30 days)
-
Assign:
- EC2
- EBS volumes
-
AWS runs backups automatically
📌 Zero manual effort
🔹 STEP 6: Restore Strategy (MOST IMPORTANT)
Backup is useless without restore testing.
Restore Options:
- Snapshot → New EBS
- AMI → New EC2
- Cross-region snapshot → DR EC2
📌 Always test restore
🧠 REAL-WORLD BACKUP POLICY (EXAMPLE)
| Backup | Frequency | Retention |
|---|---|---|
| EBS Snapshot | Daily | 7 days |
| AMI | Weekly | 4 weeks |
| Cross-region | Weekly | 4 weeks |
🧠 INTERVIEW-READY ANSWER
A robust EC2 backup strategy uses EBS snapshots for data volumes and AMIs for full server recovery. Backups should be automated using AWS Backup with defined schedules, retention policies, and regular restore testing.
⚠️ COMMON MISTAKES
❌ Only AMI, no data snapshot ❌ Manual backups ❌ No retention policy ❌ No restore testing ❌ Same-region backups only
✅ LAB 29 TASK CHECKLIST
✔ Identified backup scope ✔ Created snapshot ✔ Created AMI ✔ Understood AWS Backup ✔ Designed restore strategy
🧪 EC2 HANDS-ON – LAB 30
👉 EC2 Security Best Practices (Hardening & Real Threat Protection)


🎯 Objective of LAB 30
By the end of this lab, you will:
- Understand real EC2 security threats
- Apply hardening best practices
- Reduce attack surface
- Know what AWS secures vs what YOU secure
- Be 100% interview + production ready
🧠 FIRST: AWS Shared Responsibility Model (CRITICAL)
Security in AWS is shared.
AWS is responsible for:
- Data center security
- Hardware
- Physical network
- Hypervisor
YOU are responsible for:
- EC2 OS security
- Security Groups
- IAM
- Patching
- Application security
📌 This model applies to Amazon Web Services
🧠 REAL EC2 THREATS (MUST KNOW)
| Threat | Example |
|---|---|
| Open SSH | 0.0.0.0/0 on port 22 |
| Key leakage | .pem in GitHub |
| Unpatched OS | Exploits |
| Public services | DB exposed |
| Over-permission | IAM * access |
🔹 STEP 1: LOCK DOWN SSH (HANDS-ON CHECK)
Go to: EC2 → Security Groups → Instance SG
Ensure:
SSH (22) → My IP only
❌ Never:
0.0.0.0/0
📌 This alone blocks 90% attacks
🔹 STEP 2: REMOVE SSH COMPLETELY (BEST PRACTICE)
If using Session Manager:
- Remove SSH rule entirely
- No port 22 open
📌 Zero inbound access = zero attack surface
🔹 STEP 3: USE IAM ROLES (NO KEYS)
✔ IAM Role attached ✔ No access keys stored ✔ Temporary credentials
You already implemented this in LAB 24 ✅
🔹 STEP 4: OS HARDENING (IMPORTANT)
On EC2:
sudo dnf update -y
📌 Always:
- Patch OS
- Use Patch Manager (LAB 28)
🔹 STEP 5: MINIMIZE INSTALLED SOFTWARE
❌ Remove unused packages ✔ Only required services running
Check running services:
systemctl list-units --type=service
🔹 STEP 6: SECURITY GROUP BEST PRACTICES
| Rule | Best Practice |
|---|---|
| Inbound | Minimal |
| Outbound | Restrict if possible |
| Ports | Only required |
| Source | Known IP / SG |
📌 SG = First firewall
🔹 STEP 7: NETWORK SECURITY LAYERS (DEFENSE IN DEPTH)
Internet
 ↓
Security Group
 ↓
NACL
 ↓
OS Firewall
 ↓
Application Security
📌 Multiple layers = stronger security
🔹 STEP 8: ENABLE LOGGING & MONITORING
✔ CloudWatch Metrics ✔ CloudWatch Logs ✔ Alarms
You already implemented this in:
- LAB 21
- LAB 23
🔹 STEP 9: TAGGING FOR SECURITY & AUDIT
Add tags:
Environment = Prod
Owner = DevOps
Critical = Yes
📌 Helps:
- Audits
- Cost tracking
- Automation
🔹 STEP 10: BACKUP + DR (SECURITY TOO)
✔ Snapshots ✔ AMIs ✔ Restore testing
Security is incomplete without recovery
🧠 REAL-WORLD SECURITY CHECKLIST (SAVE THIS)
✔ No public DB ✔ No SSH open ✔ IAM roles only ✔ Patch regularly ✔ Monitor continuously ✔ Backup tested
🧠 INTERVIEW-READY ANSWER (VERY IMPORTANT)
EC2 security is achieved through defense in depth, including restrictive security groups, IAM roles instead of access keys, regular patching via Systems Manager, centralized logging with CloudWatch, and secure access using Session Manager.
⚠️ COMMON SECURITY MISTAKES
❌ SSH open to world ❌ Hardcoded credentials ❌ No monitoring ❌ No backups ❌ Over-permissioned IAM
✅ LAB 30 TASK CHECKLIST
✔ Understood shared responsibility ✔ Identified real threats ✔ Applied hardening best practices ✔ Reduced attack surface ✔ Interview-ready security knowledge
🏁 SECURITY PHASE COMPLETED 🎉
You have mastered: ✅ Access security ✅ Network security ✅ OS security ✅ Monitoring ✅ Backup & recovery
🧪 EC2 HANDS-ON – LAB 31
👉 EC2 Pricing & Cost Optimization (Save MONEY like a Pro 💰)

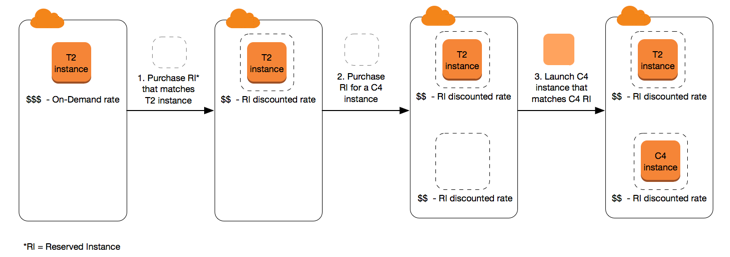
🎯 Objective of LAB 31
By the end of this lab, you will:
- Understand how EC2 pricing works
- Learn all EC2 pricing models
- Know when to use each model
- Apply real cost-optimization techniques
- Be interview + production ready
🧠 FIRST: How AWS Charges for EC2 (Simple)
AWS charges EC2 based on:
- Instance type (CPU, RAM)
- Time used (per second/minute)
- Storage (EBS)
- Data transfer
- Extra services (ELB, NAT, snapshots)
Think like:
EC2 = Rent for a virtual server 🏠
🧠 EC2 PRICING MODELS (MUST KNOW)
1️⃣ On-Demand Instances
What it is
- Pay as you go
- No commitment
Use when
- Learning
- Testing
- Short-term workloads
Pros ✔ Flexible ✔ No upfront cost
Cons ❌ Most expensive
2️⃣ Reserved Instances (RI)
What it is
- 1-year or 3-year commitment
- Big discount
Use when
- Steady workloads
- Production systems
Savings 💰 Up to 72%
Types
- Standard RI
- Convertible RI
3️⃣ Savings Plans (MODERN & IMPORTANT)
What it is
- Commit to $ per hour
- Flexible across instance types
Use when
- Long-running apps
- Microservices
📌 AWS recommends Savings Plans over RIs
4️⃣ Spot Instances (VERY IMPORTANT)
What it is
- Use spare AWS capacity
- Very cheap
Savings 💰 Up to 90%
Risk ❌ Can be terminated anytime
Use when
- Batch jobs
- CI/CD
- Big data processing
🧠 QUICK INTERVIEW TABLE
| Model | Cost | Risk | Use Case |
|---|---|---|---|
| On-Demand | High | None | Dev/Test |
| Reserved | Low | Low | Prod |
| Savings Plan | Low | Low | Prod |
| Spot | Very Low | High | Batch |
🔹 STEP 1: View EC2 Pricing in Console
- AWS Console → EC2
- Click Instance types
- Select
t2.micro - Click Pricing
📌 Pricing varies by:
- Region
- OS
🔹 STEP 2: Check Your CURRENT COST
-
AWS Console → Billing
-
Open Cost Explorer
-
Filter:
- Service → EC2
- Time → Last 7 days
📌 This shows real money usage
🔹 STEP 3: IDENTIFY COST WASTAGE (REAL WORLD)
Look for: ❌ Stopped but attached EBS ❌ Unused Elastic IPs ❌ Oversized instances ❌ Idle EC2s
🔹 STEP 4: INSTANCE RIGHT-SIZING (IMPORTANT)
Use:
- CloudWatch CPU metrics
Example:
- CPU < 10% always ❌ → Instance is oversized
Solution:
- Move from
t3.large → t3.micro
📌 Saves money immediately
🔹 STEP 5: AUTO SCALING = COST SAVER
✔ Scale out only when needed ✔ Scale in during low traffic
You already implemented this in LAB 19 & 22
🔹 STEP 6: SPOT INSTANCES (CONCEPTUAL)
In ASG:
-
Mix:
- On-Demand (base)
- Spot (extra capacity)
📌 Production-grade cost optimization
🔹 STEP 7: SCHEDULE STOP/START (HUGE SAVINGS)
For non-prod:
- Stop EC2 at night
- Start in morning
Can save: 💰 60–70% monthly
Use:
- EventBridge
- Lambda
- SSM Automation
🧠 REAL-WORLD COST OPTIMIZATION CHECKLIST
✔ Use right instance size ✔ Use Savings Plans ✔ Auto Scaling enabled ✔ Use Spot for batch ✔ Delete unused resources ✔ Monitor monthly bill
🧠 INTERVIEW-READY ANSWER
EC2 cost optimization involves selecting the appropriate pricing model such as On-Demand, Reserved Instances, Savings Plans, or Spot Instances, combined with right-sizing, Auto Scaling, and continuous monitoring using Cost Explorer and CloudWatch.
⚠️ COMMON COST MISTAKES
❌ Leaving EC2 running unused ❌ Ignoring EBS & snapshots ❌ No Auto Scaling ❌ No cost monitoring
✅ LAB 31 TASK CHECKLIST
✔ Understood pricing models ✔ Checked EC2 pricing ✔ Viewed Cost Explorer ✔ Identified cost wastage ✔ Learned optimization strategies
🧪 EC2 HANDS-ON – LAB 32
👉 Spot Instances (Ultra-Low Cost EC2 + Risk Handling)
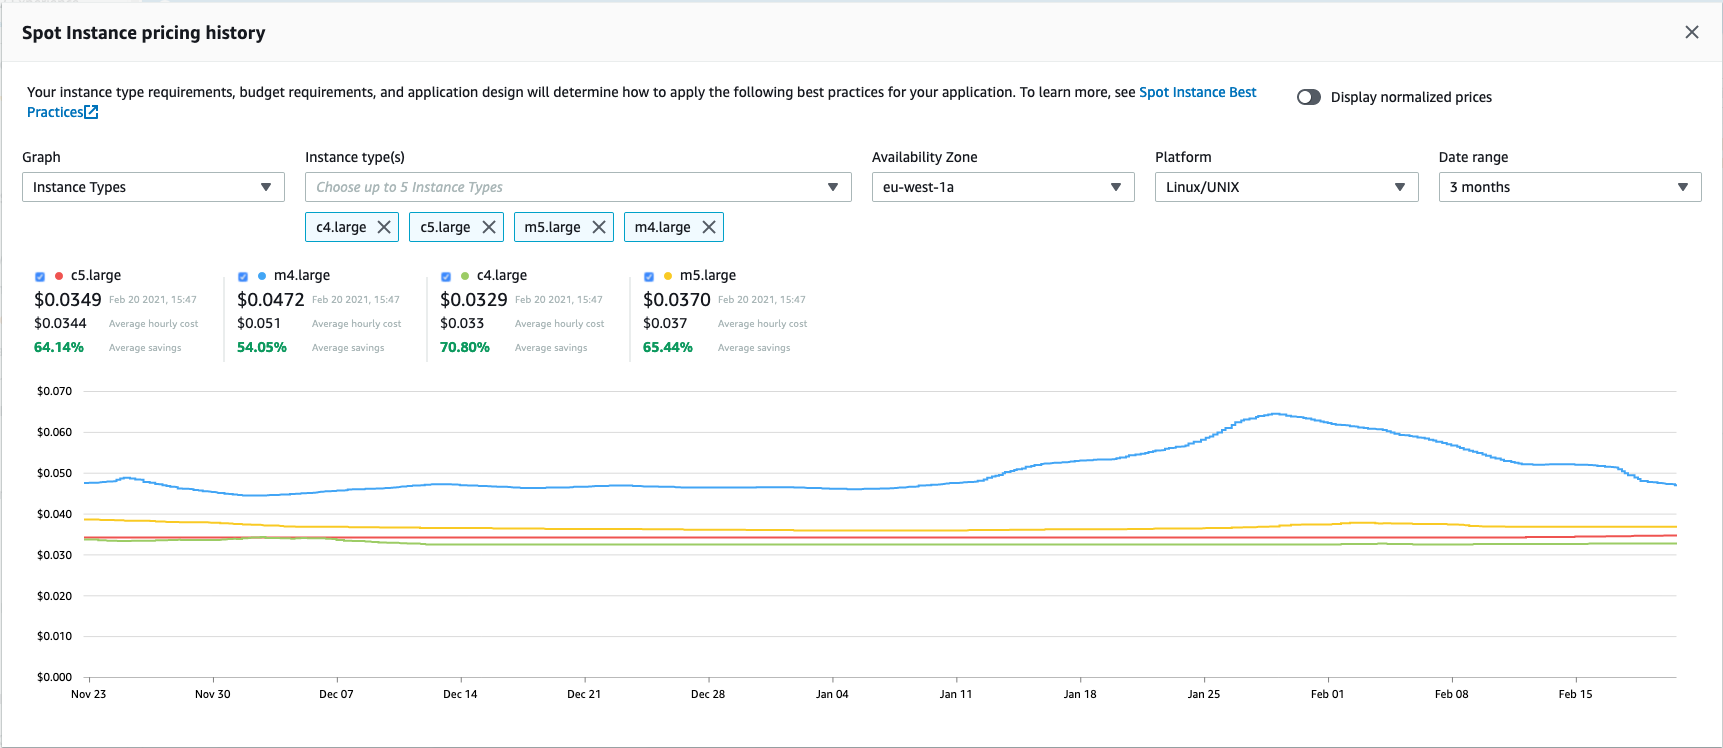
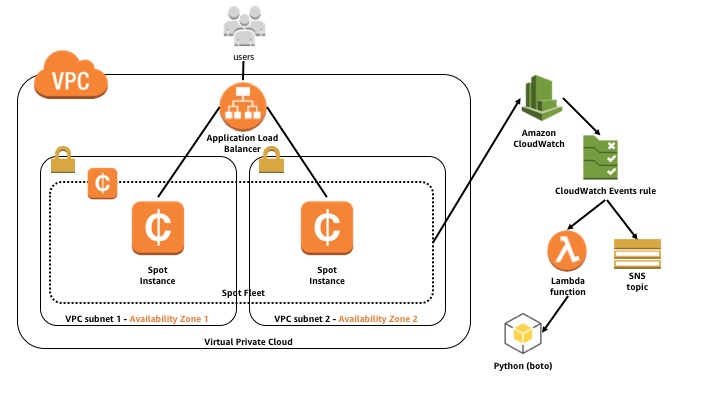

🎯 Objective of LAB 32
By the end of this lab, you will:
- Understand what Spot Instances are
- Launch a Spot EC2
- Handle interruption safely
- Use Spot with Auto Scaling
- Be interview + production ready
🧠 FIRST: What is a Spot Instance? (Simple Words)
A Spot Instance:
- Uses unused EC2 capacity
- Is very cheap
- Can be stopped by AWS anytime
Think like:
Spot = Traveling in empty train seats 🚆 Cheap, but seat may be taken back
Spot is part of Amazon Web Services EC2 pricing
🧠 WHY Spot is SO CHEAP?
AWS sells:
- Spare capacity
- With no guarantee
💰 Savings:
- Up to 90% cheaper than On-Demand
🧠 THE BIG RISK (MUST KNOW)
❗ Spot instances can be:
- Interrupted with 2-minute warning
- Terminated or stopped
👉 Never use Spot alone for critical apps
🔹 WHEN TO USE SPOT (REAL USE CASES)
✔ Batch processing ✔ CI/CD builds ✔ Big data jobs ✔ Auto Scaling extra capacity ✔ Non-critical workloads
❌ NOT for:
- Databases
- Single EC2 prod apps
- Stateful services
🔹 STEP 1: Launch a Spot Instance (Hands-On)
- EC2 → Launch instance
- Name:
ec2-spot-demo
Instance Details
- AMI → Amazon Linux 2023
- Instance type →
t3.micro - Key pair → existing
Advanced Details (IMPORTANT)
Scroll to Advanced details
- Purchasing option → Spot
- Spot instance type → One-time
- Interruption behavior → Terminate
- Max price → Leave empty (recommended)
📌 AWS will pick cheapest available Spot
Security Group
- SSH (22) → My IP
- HTTP (80) → Anywhere
Launch Instance
Click Launch instance
🔹 STEP 2: Verify Spot Instance
- EC2 → Instances
- Select instance
- Check:
Instance lifecycle → Spot
🎉 You are running a Spot EC2
🔹 STEP 3: Spot Interruption Notice (CRITICAL)
AWS provides:
2-minute warning
Available at:
http://169.254.169.254/latest/meta-data/spot/instance-action
🔹 STEP 4: CHECK INTERRUPTION (Hands-On)
SSH into Spot EC2:
ssh -i ec2-key-hands-on.pem ec2-user@SPOT_PUBLIC_IP
Run:
curl http://169.254.169.254/latest/meta-data/spot/instance-action
Output:
- Empty → No interruption
- JSON → Interruption coming
📌 This endpoint is very important for automation
🔹 STEP 5: HANDLE INTERRUPTION SAFELY (CONCEPT)
In real systems:
- Save work to S3
- Send logs to CloudWatch
- Gracefully stop job
Example logic:
If interruption notice:
 → checkpoint work
 → upload results
 → exit cleanly
🔹 STEP 6: Spot with Auto Scaling (BEST PRACTICE)
In production:
-
Use Mixed Instance Policy
-
Combine:
- On-Demand (base)
- Spot (extra capacity)
📌 If Spot is interrupted:
- ASG replaces it automatically
🧠 INTERVIEW-READY COMPARISON
| Feature | On-Demand | Spot |
|---|---|---|
| Price | High | Very Low |
| Reliability | High | Medium |
| Interruption | ❌ No | ✅ Yes |
| Use case | Prod | Batch / ASG |
🧠 INTERVIEW-READY ANSWER
Spot Instances allow customers to use spare EC2 capacity at significantly reduced prices, with the trade-off that instances can be interrupted with a two-minute warning. They are ideal for fault-tolerant and stateless workloads.
⚠️ COMMON MISTAKES
❌ Using Spot for databases ❌ No checkpointing ❌ No ASG fallback ❌ Expecting 24/7 availability
✅ LAB 32 TASK CHECKLIST
✔ Launched Spot EC2 ✔ Verified Spot lifecycle ✔ Checked interruption endpoint ✔ Understood risk handling ✔ Learned cost-saving strategy
🧪 EC2 HANDS-ON – LAB 33
👉 Instance Right-Sizing (Performance ⚖️ Cost Balance)
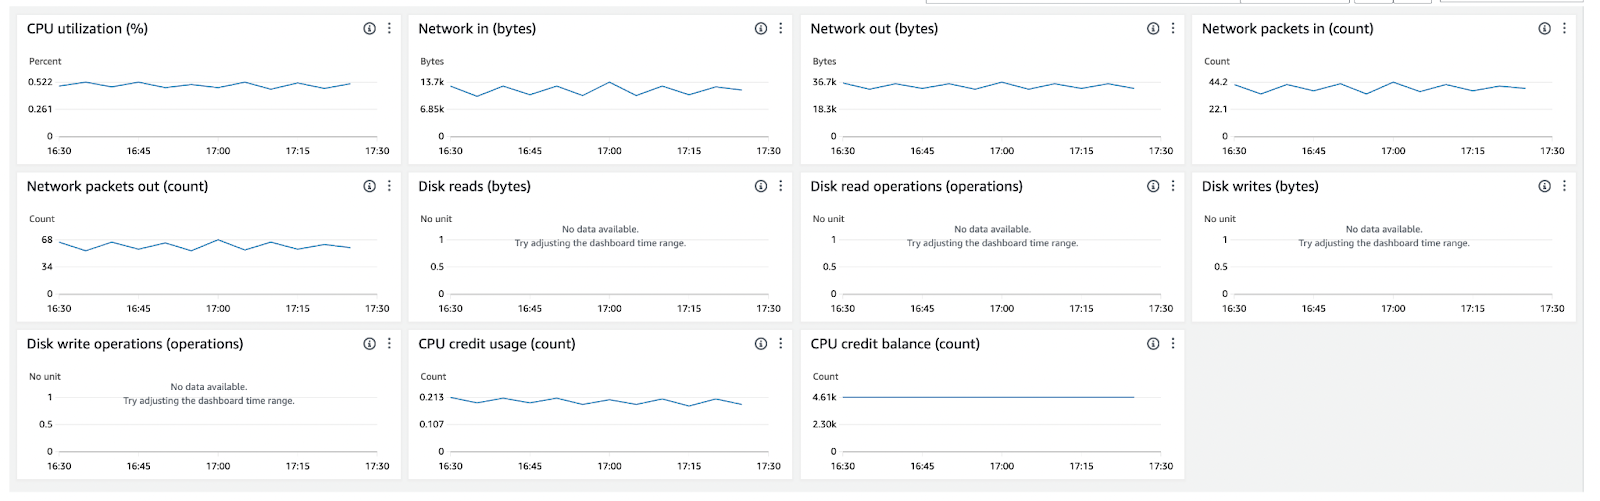


🎯 Objective of LAB 33
By the end of this lab, you will:
- Understand what right-sizing really means
- Use CloudWatch metrics to detect waste
- Learn how to choose the correct instance type
- Know AWS Compute Optimizer
- Be interview + production ready
🧠 FIRST: What is Instance Right-Sizing?
Right-sizing means:
- Choosing the smallest EC2 instance
- That still delivers required performance
Think like:
Don’t use a truck 🚚 to carry a backpack 🎒
🧠 WHY Right-Sizing is IMPORTANT?
❌ Oversized instance → Money waste ❌ Undersized instance → Performance issues
✔ Right-sized → Optimal cost + performance
🔹 STEP 1: Identify a Candidate EC2
Pick:
ec2-hands-on-1or- Any EC2 from your Auto Scaling Group
🔹 STEP 2: Analyze CPU Utilization (MOST IMPORTANT)
- Open CloudWatch
- Go to Metrics → EC2 → Per-Instance Metrics
- Select CPUUtilization
Look at:
- Last 7–14 days
- Average CPU %
Decision Rule (SAVE THIS)
| CPU Usage | Meaning |
|---|---|
| < 10% | ❌ Over-provisioned |
| 10–40% | ✅ Right-sized |
| > 70% | ❌ Under-provisioned |
🔹 STEP 3: Analyze Memory (IMPORTANT CONCEPT)
⚠️ EC2 does NOT send memory metrics by default.
To monitor memory:
- Install CloudWatch Agent
- Send memory metrics
📌 In production, CPU alone is not enough
🔹 STEP 4: Check Network & Disk Metrics
Also check:
- NetworkIn / NetworkOut
- DiskReadOps / DiskWriteOps
📌 If all metrics are low → instance is oversized
🔹 STEP 5: Example Right-Sizing Decision
Current setup:
t3.large
CPU avg = 8%
Better option:
t3.micro or t3.small
💰 Savings:
- Up to 70% monthly
🔹 STEP 6: Use AWS Compute Optimizer (BEST PRACTICE)
AWS provides AWS Compute Optimizer
What it does:
✔ Analyzes EC2 usage ✔ Recommends better instance types ✔ Uses machine learning
How to Check:
- AWS Console → Compute Optimizer
- Enable it (one-time)
- Go to EC2 recommendations
📌 This is enterprise-grade optimization
🔹 STEP 7: Right-Sizing with Auto Scaling (BEST)
Instead of one big EC2:
- Use smaller instances
- Scale horizontally with ASG
Example:
1 × t3.large ❌
3 × t3.micro ✅
✔ Cheaper ✔ More resilient
🧠 INTERVIEW-READY ANSWER
Instance right-sizing involves analyzing CloudWatch metrics such as CPU, memory, and network usage to select the most cost-effective EC2 instance type without compromising performance. AWS Compute Optimizer can automate recommendations using machine learning.
⚠️ COMMON MISTAKES
❌ Right-sizing based on CPU only ❌ Ignoring peak usage ❌ No monitoring after resizing ❌ Manual guesses instead of data
✅ LAB 33 TASK CHECKLIST
✔ Analyzed CPU utilization ✔ Understood over vs under sizing ✔ Learned memory monitoring concept ✔ Used Compute Optimizer (conceptually) ✔ Learned cost-performance balance
🧪 EC2 HANDS-ON – LAB 34
👉 Free Tier Safety & Cleanup (Avoid Billing Surprises)

🎯 Objective of LAB 34
By the end of this lab, you will:
- Know exact EC2 Free Tier limits
- Identify hidden cost traps
- Clean up unused resources safely
- Set billing alerts
- Be 100% safe from surprise bills
🧠 FIRST: What Does EC2 Free Tier REALLY Give?
Under **Amazon Web Services Free Tier (12 months):
EC2 Compute
✔ 750 hours / month
t2.microort3.micro- Linux or Windows
📌 1 instance × 24 × 30 ≈ 720 hours 👉 Only ONE instance should run continuously
EBS Storage
✔ 30 GB total
- Root + additional volumes combined
Snapshots
✔ 1 GB free ❌ Extra snapshots = charged
Data Transfer
✔ 15 GB outbound / month ❌ More = charged
🧠 MOST COMMON BILLING TRAPS (READ CAREFULLY)
| Trap | Why Cost Happens |
|---|---|
| Multiple EC2 running | Hours exceed 750 |
| Unused EBS volumes | Charged even if EC2 stopped |
| Elastic IP not attached | Charged |
| NAT Gateway | Always paid ❌ |
| Load Balancer | Charged hourly ❌ |
| Old snapshots | Storage cost |
| Stopped EC2 | EBS still billed |
🔹 STEP 1: CHECK WHAT IS CURRENTLY RUNNING
Go to:
- EC2 → Instances
Action:
- Keep only 1 required EC2
- Stop or terminate others
📌 Recommendation:
- Keep
ec2-hands-on-1 - Stop learning/test EC2s
🔹 STEP 2: CLEAN UP LOAD BALANCER (IMPORTANT)
- EC2 → Load Balancers
- Delete:
alb-ec2-hands-on
📌 ALB is NOT free tier
🔹 STEP 3: CLEAN UP AUTO SCALING
- EC2 → Auto Scaling Groups
- Delete:
asg-ec2-hands-on
📌 This also terminates ASG EC2s
🔹 STEP 4: DELETE UNUSED EBS VOLUMES
- EC2 → Volumes
- Delete:
- Volumes not attached to any EC2
- Old test volumes
📌 Look for:
State: available
🔹 STEP 5: DELETE OLD SNAPSHOTS
- EC2 → Snapshots
- Delete:
- Test snapshots
- Old backups you don’t need
📌 Snapshots accumulate cost silently
🔹 STEP 6: RELEASE UNUSED ELASTIC IPs
- EC2 → Elastic IPs
- If any EIP is:
Not associated
→ Release it
📌 Unattached EIP = charged
🔹 STEP 7: CHECK NAT GATEWAY (CRITICAL)
- VPC → NAT Gateways
- If exists → DELETE
⚠️ NAT Gateway is expensive (~₹3–4 per hour)
🔹 STEP 8: SET BILLING ALERT (MUST DO)
Enable Billing Alerts
- Billing → Billing preferences
- Enable:
Receive Billing Alerts
Create Budget Alert
- Billing → Budgets
- Create budget:
Monthly cost budget = $5
- Email notification → Your email
📌 You’ll get alert before bill increases
🧠 SAFE FREE TIER SETUP (RECOMMENDED)
✔ 1 EC2 (t2/t3.micro) ✔ No ALB ✔ No NAT Gateway ✔ Minimal EBS (≤ 30 GB) ✔ Stop EC2 when not needed
🧠 INTERVIEW-READY ANSWER
To stay within the EC2 Free Tier, I monitor running hours, clean up unused EBS volumes, snapshots, Elastic IPs, and disable paid services like Load Balancers and NAT Gateways. I also configure AWS Budgets and billing alerts to avoid unexpected charges.
⚠️ FINAL WARNING (IMPORTANT)
AWS will NOT stop services automatically Responsibility is yours
👉 This lab saves real money 💰
✅ LAB 34 TASK CHECKLIST
✔ Checked EC2 running hours ✔ Deleted ALB & ASG ✔ Cleaned EBS volumes ✔ Removed snapshots ✔ Released Elastic IPs ✔ Set billing alert
🧪 EC2 HANDS-ON – LAB 35
👉 Production EC2 Architecture (End-to-End Real-World Setup)
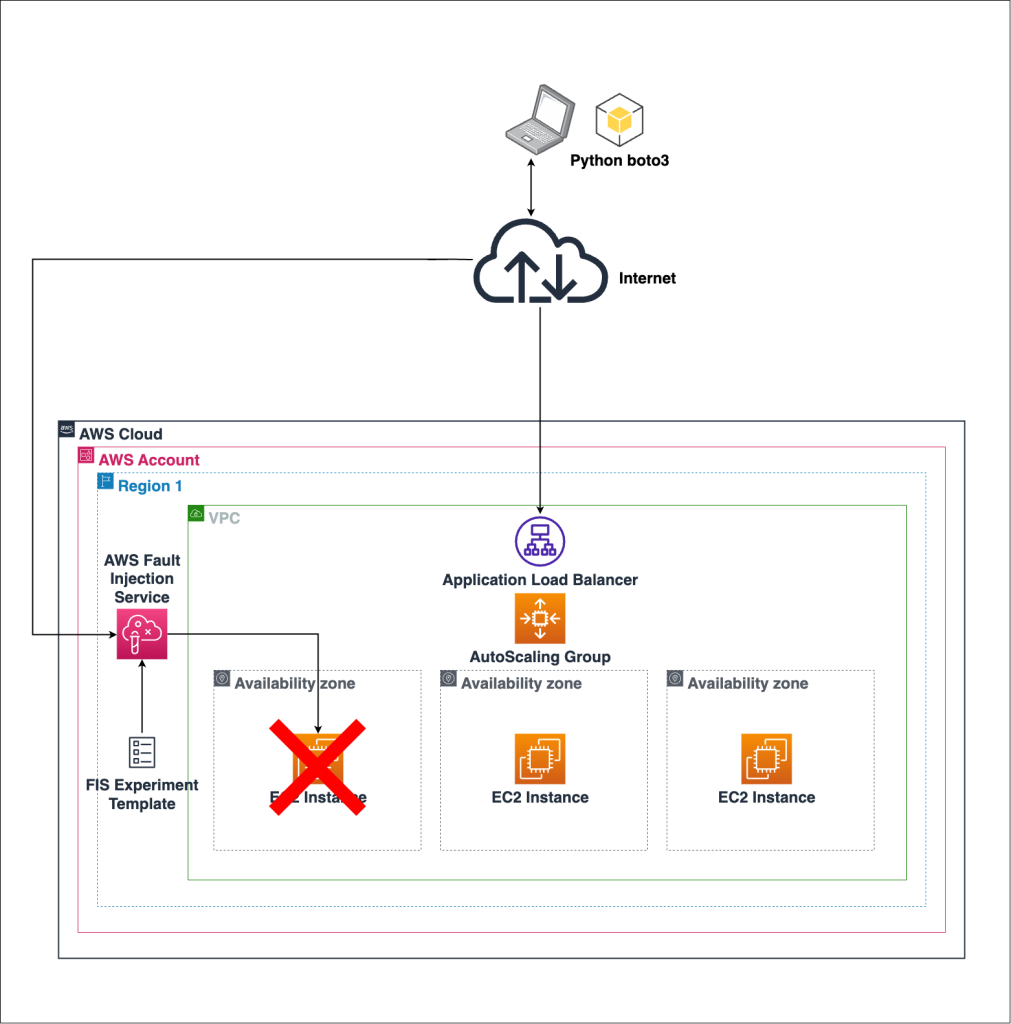

🎯 Project Goal
Design and understand a secure, scalable, highly available, and cost-optimized EC2 production architecture — exactly what companies use.
By the end, you’ll be able to:
- Design EC2 architecture from scratch
- Explain every component confidently
- Answer real interview system-design questions
- Operate EC2 like a production engineer
🏗️ FINAL ARCHITECTURE (WHAT YOU BUILT)
Users
  ↓
Route 53 (DNS)
  ↓
Application Load Balancer (Multi-AZ, Public Subnets)
  ↓
Auto Scaling Group (Multi-AZ)
  ↓
EC2 Instances (Private Subnets)
  ↓
EBS (Persistent Storage)

Security & Ops:
- IAM Roles (no keys)
- Session Manager (no SSH)
- CloudWatch (metrics, logs, alarms)
- Patch Manager (automated updates)
- Backups (Snapshots + AMIs)
🔹 COMPONENT BREAKDOWN (REAL-WORLD VIEW)
1️⃣ VPC & Networking
-
Public Subnets
- ALB
- Bastion (optional / legacy)
-
Private Subnets
- EC2 instances (no public IP)
-
Internet Gateway → Internet access for ALB
-
NAT Gateway → Outbound internet for private EC2 (optional in prod)
✅ Result: No EC2 exposed to the internet
2️⃣ Compute Layer (EC2)
- EC2 launched via Auto Scaling Group
- Uses Golden AMI
- Stateless design
- Automatically replaced if unhealthy
✅ Result: Self-healing compute layer
3️⃣ Load Balancing
- Application Load Balancer
- Multi-AZ
- Health checks
- Routes traffic only to healthy EC2s
✅ Result: Zero-downtime traffic handling
4️⃣ Scaling
- Auto Scaling Group
- CloudWatch CPU metrics
- Scale out during load
- Scale in during low traffic
✅ Result: Performance + cost efficiency
5️⃣ Security
- IAM Roles (no access keys)
- Session Manager (no SSH, no port 22)
- Security Groups (least privilege)
- Private subnets for EC2
✅ Result: Enterprise-grade security
6️⃣ Monitoring & Logs
- CloudWatch Metrics (CPU, Network)
- CloudWatch Alarms (alerts, scaling)
- CloudWatch Logs (Apache / app logs)
✅ Result: Fast troubleshooting & observability
7️⃣ Patch Management
- AWS Systems Manager Patch Manager
- Scan & install patches
- Maintenance windows
✅ Result: Always-patched, compliant servers
8️⃣ Backup & Recovery
- EBS Snapshots → data backup
- AMIs → full server backup
- Restore testing strategy
✅ Result: Disaster-ready architecture
9️⃣ Cost Optimization
- Right-sized instances
- Auto Scaling
- Spot instances (for non-critical workloads)
- Billing alerts
- Free-tier safety cleanup
✅ Result: No surprise bills
🧠 INTERVIEW-READY SYSTEM DESIGN ANSWER (⭐ GOLD ⭐)
“I design EC2 architectures using a VPC with public and private subnets, place an Application Load Balancer in public subnets, and run EC2 instances in private subnets via Auto Scaling Groups across multiple Availability Zones. I use IAM roles instead of access keys, Session Manager instead of SSH, CloudWatch for monitoring, Systems Manager for patching, and EBS snapshots plus AMIs for backup. This ensures high availability, security, scalability, and cost efficiency.”
🧠 WHAT YOU HAVE MASTERED (BIG LIST)
✅ EC2 fundamentals ✅ SSH, Key Pairs, Session Manager ✅ Security Groups & NACLs ✅ EBS, Snapshots, AMIs ✅ User Data automation ✅ Multi-AZ architecture ✅ Load Balancers ✅ Auto Scaling ✅ CloudWatch monitoring & alarms ✅ Logs & troubleshooting ✅ IAM roles & security ✅ Patch management ✅ Backup & DR ✅ Cost optimization ✅ Free tier safety ✅ Production EC2 architecture
🧪 EC2 HANDS-ON – LAB 36
👉 Host a Full Web App (Frontend + Backend) on EC2


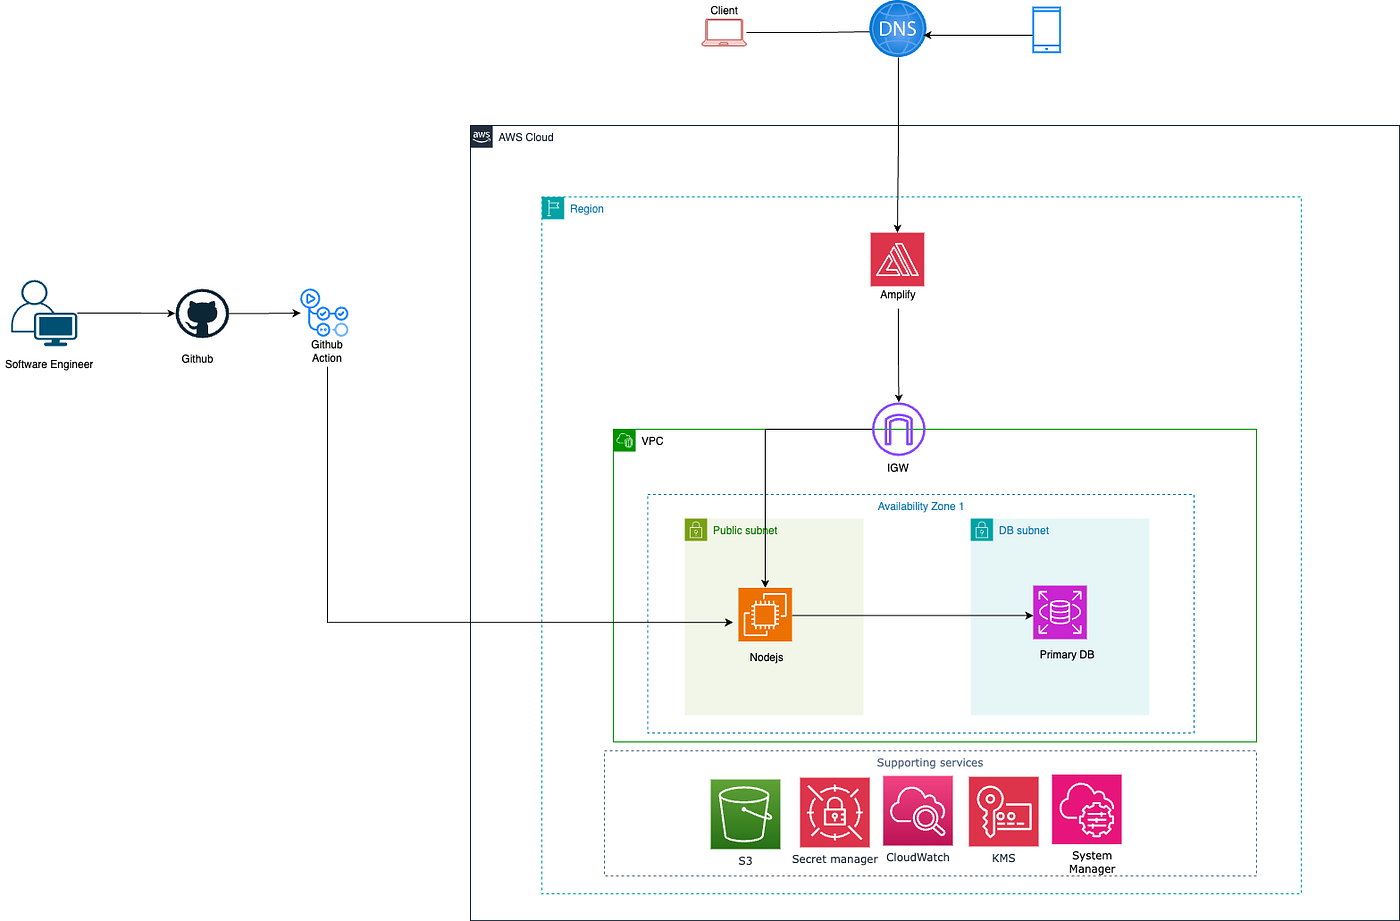

🎯 Objective of LAB 36
By the end of this lab, you will:
- Deploy a real frontend + backend
- Run backend on a custom port
- Use Nginx as reverse proxy
- Access the app via single public URL
- Understand real-world EC2 app hosting
🧠 Architecture (What We Are Building)
Browser
  ↓
Nginx (Port 80)
  ↓
Backend API (Node.js – Port 3000)
📌 Frontend served by Nginx 📌 Backend runs separately 📌 User never sees backend port
🔹 Tech Stack (Simple & Practical)
- Frontend: Static HTML
- Backend: Node.js (Express)
- Web Server / Proxy: Nginx
- Server: EC2 (Amazon Linux)
👉 This setup is very common in real companies
🔹 STEP 1: Use a CLEAN EC2 Instance
Use:
ec2-hands-on-1
Make sure:
- Instance is running
- Port 80 allowed in Security Group
- You can connect via Session Manager or SSH
🔹 STEP 2: Install Required Software
Connect to EC2
ssh -i ec2-key-hands-on.pem ec2-user@PUBLIC_IP
Update OS
sudo dnf update -y
Install Node.js
sudo dnf install nodejs -y
📌 nodejs → runtime for backend
📌 Comes with npm
Verify:
node -v
npm -v
🔹 STEP 3: Create Backend Application
Create app folder
mkdir backend
cd backend
Initialize Node project
npm init -y
📌 Creates package.json
Install Express
npm install express
Create Backend File
nano index.js
Paste this:
const express = require('express');
const app = express();

app.get('/api/hello', (req, res) => {
  res.json({ message: 'Hello from Backend API 🚀' });
});

app.listen(3000, () => {
  console.log('Backend running on port 3000');
});
Save → CTRL + X → Y → Enter
Run Backend
node index.js
You should see:
Backend running on port 3000
🔹 STEP 4: Test Backend Directly (Important)
Open browser:
http://PUBLIC_IP:3000/api/hello
Expected output:
{"message":"Hello from Backend API 🚀"}
✅ Backend works
🔹 STEP 5: Install & Configure Nginx (Frontend + Proxy)
Install Nginx
sudo dnf install nginx -y
Start & enable:
sudo systemctl start nginx
sudo systemctl enable nginx
🔹 STEP 6: Create Frontend Page
sudo nano /usr/share/nginx/html/index.html
Paste:
<!DOCTYPE html>
<html>
<head>
  <title>EC2 Full Stack App</title>
</head>
<body>
  <h1>Frontend on EC2 🎉</h1>
  <button onclick="callApi()">Call Backend</button>
  <p id="result"></p>

  <script>
    function callApi() {
      fetch('/api/hello')
        .then(res => res.json())
        .then(data => {
          document.getElementById('result').innerText = data.message;
        });
    }
  </script>
</body>
</html>
Save & exit
🔹 STEP 7: Configure Nginx as Reverse Proxy (MOST IMPORTANT)
Edit config:
sudo nano /etc/nginx/conf.d/app.conf
Paste:
server {
    listen 80;

    location / {
        root /usr/share/nginx/html;
        index index.html;
    }

    location /api/ {
        proxy_pass http://localhost:3000;
        proxy_set_header Host $host;
        proxy_set_header X-Real-IP $remote_addr;
    }
}
Save & exit
Restart Nginx
sudo nginx -t
sudo systemctl restart nginx
📌 nginx -t → checks config (VERY IMPORTANT)
🔹 STEP 8: FINAL TEST (BIG MOMENT 🎉)
Open browser:
http://PUBLIC_IP
1️⃣ Frontend loads 2️⃣ Click Call Backend 3️⃣ You see:
Hello from Backend API 🚀
🎉 FULL STACK APP IS LIVE ON EC2
🧠 REAL-WORLD LEARNING (IMPORTANT)
✔ Backend runs independently ✔ Nginx hides backend port ✔ One clean public URL ✔ Same pattern used with React / Spring Boot
🧠 INTERVIEW-READY ANSWER
I deployed a full-stack application on EC2 using Nginx as a reverse proxy. The frontend is served on port 80, while the backend API runs on a separate port and is securely accessed through Nginx.
✅ LAB 36 TASK CHECKLIST
✔ Backend API running ✔ Frontend served via Nginx ✔ Reverse proxy working ✔ Single public endpoint ✔ Real-world deployment experience
🧪 EC2 HANDS-ON – LAB 37
👉 EC2 + RDS Architecture (Production-Style App + Database)
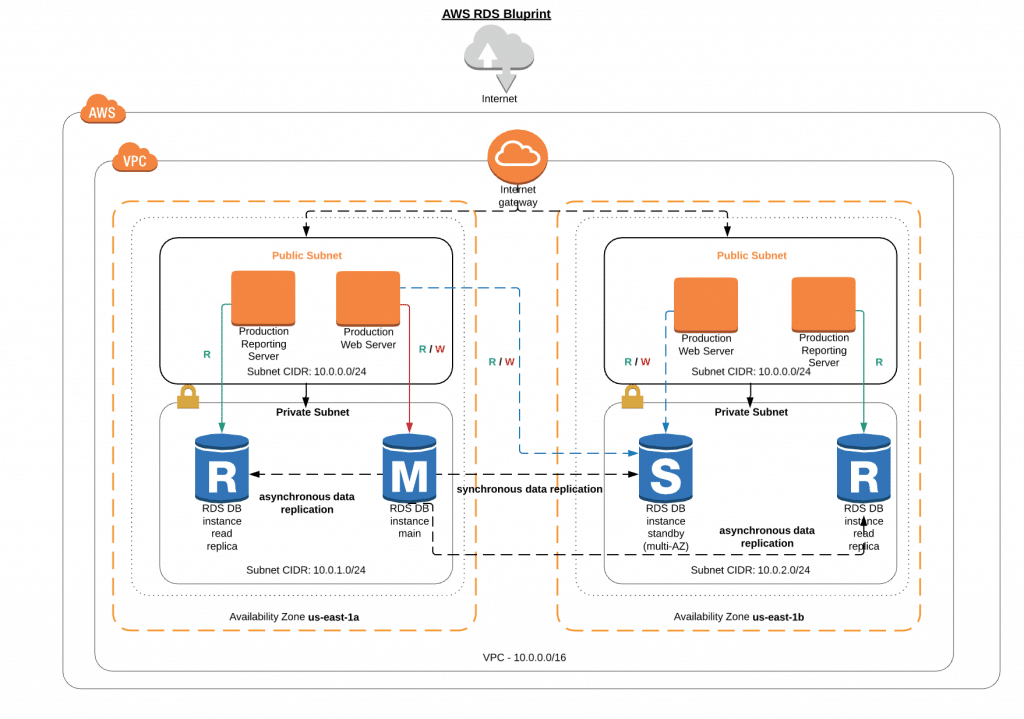

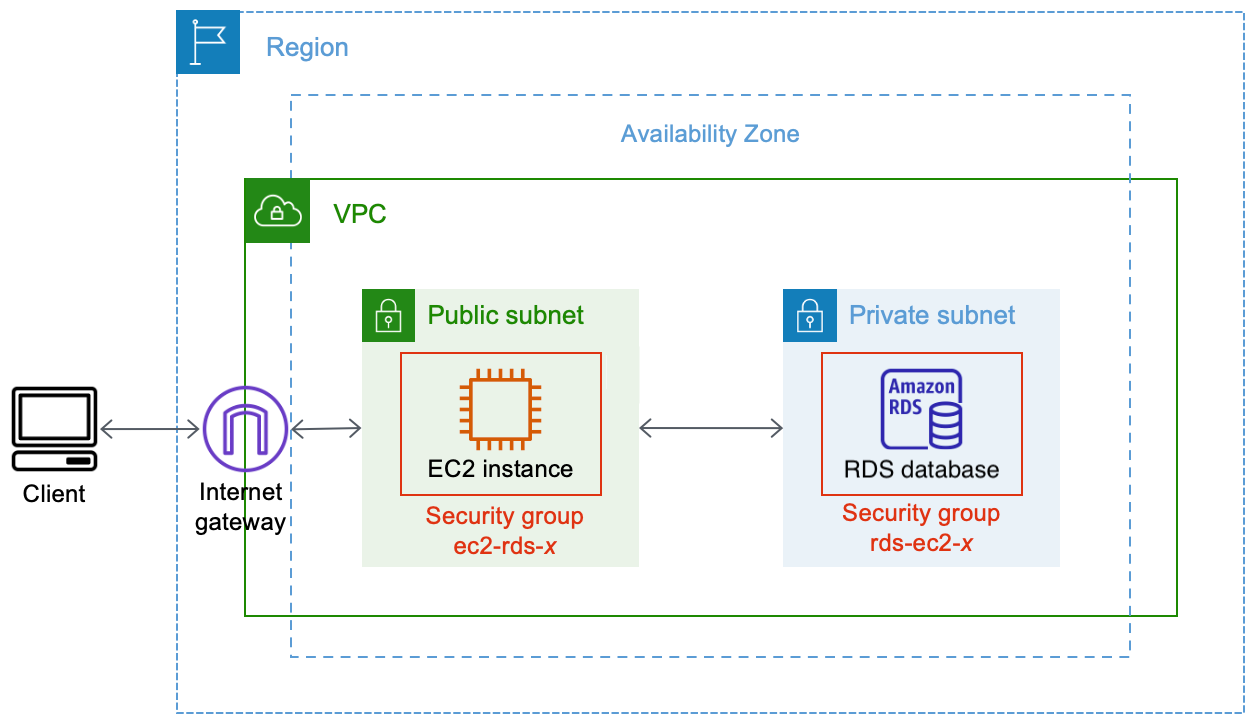
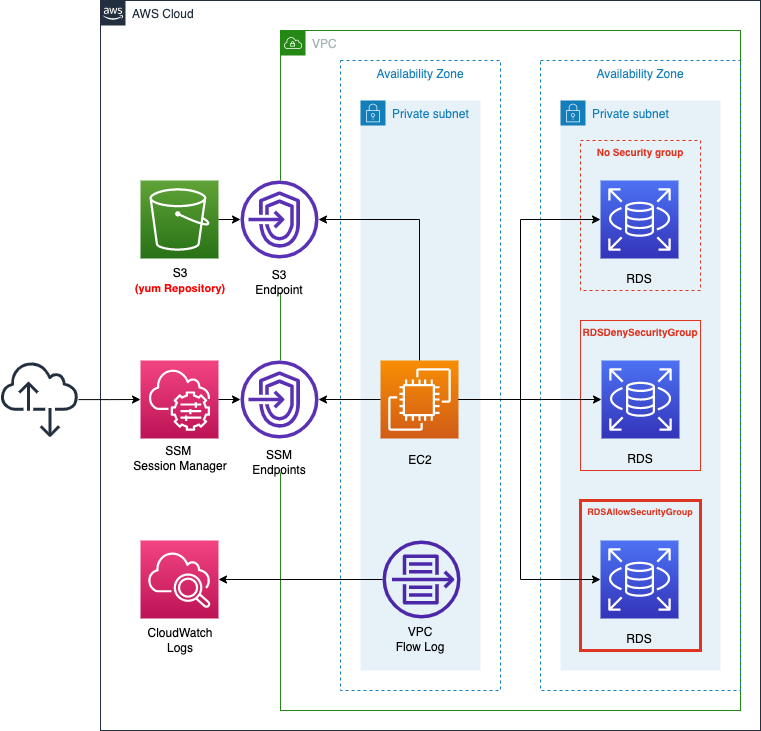
🎯 Objective of LAB 37
By the end of this lab, you will:
- Understand why databases should NOT run on EC2
- Deploy Amazon RDS in a private subnet
- Connect EC2 → RDS securely
- Use Security Group chaining
- Be able to explain real production architecture
🧠 FIRST: Why EC2 + RDS? (Very Important)
❌ Database on EC2:
- Manual backup
- Manual patching
- Manual scaling
- High risk
✅ Amazon RDS:
- Managed backups
- Automatic patching
- High availability
- Secure by default
Think like:
EC2 = App server 🧠 RDS = Managed database 🗄️
🧠 ARCHITECTURE (WHAT WE ARE BUILDING)
User
 ↓
ALB (Public Subnet)
 ↓
EC2 (Private Subnet)
 ↓
RDS (Private Subnet, NO public access)
📌 Database is never public
🔹 STEP 1: Decide RDS Engine (Simple Choice)
For learning:
-
Engine → MySQL
-
Reason:
- Popular
- Simple
- Widely used in interviews
🔹 STEP 2: Create RDS Database
- AWS Console → Search RDS
- Click Create database
Database creation method
- Select → Standard create
Engine options
- Engine → MySQL
Templates
- Select → Free tier
📌 This avoids billing issues
Settings
- DB instance identifier:
ec2-app-db
- Master username:
admin
- Password → set & remember
Instance configuration
- DB instance class →
db.t3.micro - Storage → 20 GB (default)
🔹 STEP 3: Network Settings (MOST IMPORTANT)
Connectivity
- VPC → your VPC
- Subnet group → default
- Public access → ❌ No
📌 This ensures RDS is PRIVATE
Security Group
Create new SG:
rds-sg
Inbound rule:
| Type | Port | Source |
|---|---|---|
| MySQL | 3306 | EC2 Security Group |
📌 SG → SG reference (VERY IMPORTANT)
🔹 STEP 4: Create Database
Click Create database
⏳ Wait 5–10 minutes Status → Available
🔹 STEP 5: Get RDS Endpoint
After creation:
- Copy Endpoint Example:
ec2-app-db.xxxxx.ap-south-1.rds.amazonaws.com
📌 This replaces IP address
🔹 STEP 6: Connect from EC2 to RDS (Hands-On)
SSH into EC2:
ssh -i ec2-key-hands-on.pem ec2-user@EC2_PRIVATE_OR_PUBLIC_IP
Install MySQL client:
sudo dnf install mysql -y
Connect to RDS:
mysql -h RDS_ENDPOINT -u admin -p
Enter password
If login succeeds 🎉
You’ll see:
mysql>
✅ EC2 → RDS connectivity works ❌ RDS still NOT accessible from internet
🔹 STEP 7: Create Test Database (Optional)
Inside MySQL:
CREATE DATABASE appdb;
USE appdb;
CREATE TABLE users (id INT, name VARCHAR(50));
Exit:
exit
🧠 SECURITY PROOF (INTERVIEW GOLD)
✔ RDS has no public IP ✔ Only EC2 SG can access RDS ✔ Internet traffic blocked ✔ Least privilege networking
🧠 INTERVIEW-READY ANSWER
In production, I deploy EC2 instances in private subnets and use Amazon RDS for the database. RDS is not publicly accessible and is secured using security group references so only the application EC2 instances can connect to it.
⚠️ COMMON MISTAKES
❌ Making RDS public ❌ Using IP instead of SG reference ❌ Running DB on EC2 ❌ Hardcoding DB credentials
✅ LAB 37 TASK CHECKLIST
✔ Created RDS MySQL instance ✔ Disabled public access ✔ Used SG-to-SG rule ✔ Connected EC2 → RDS ✔ Understood production DB design
🧪 EC2 HANDS-ON – LAB 38
👉 EC2 Zero-Downtime Deployment (Blue–Green Deployment)

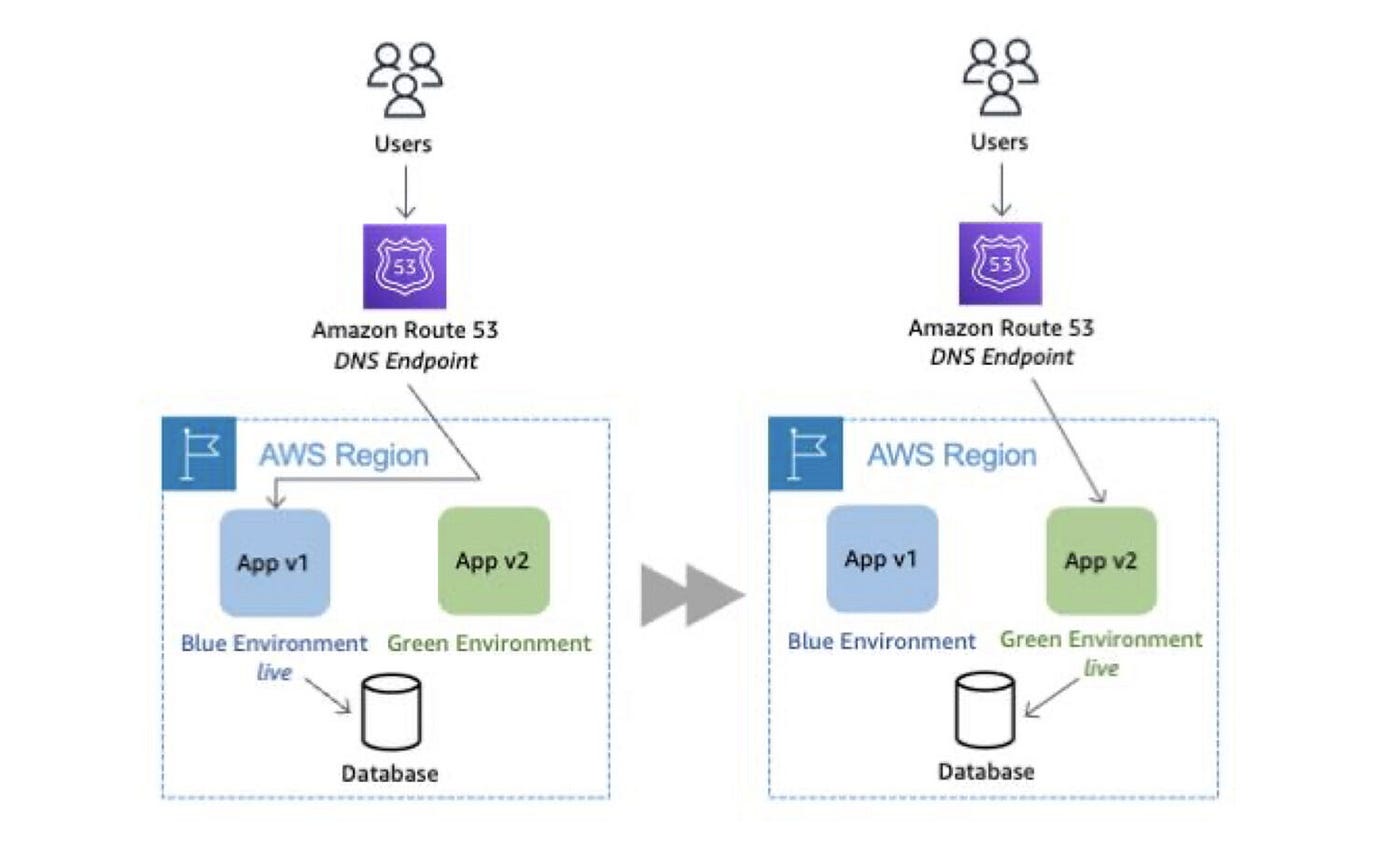
🎯 Objective of LAB 38
By the end of this lab, you will:
- Understand zero-downtime deployment
- Implement Blue–Green deployment using ALB
- Deploy a new app version without downtime
- Perform instant rollback
- Be senior-level interview ready
🧠 FIRST: What is Zero-Downtime Deployment?
Zero-downtime deployment means:
- Users never see downtime
- App is updated while traffic is live
❌ Old way:
Stop app → Deploy → Start app → Downtime
✅ Modern way:
Deploy new version → Switch traffic → Done
🧠 What is Blue–Green Deployment?
| Environment | Meaning |
|---|---|
| Blue | Current production version |
| Green | New version |
Traffic is switched using Load Balancer, not DNS.
Think like:
Two roads 🛣️ Traffic signal switches instantly 🚦
🧠 ARCHITECTURE (WHAT WE BUILD)
Users
 ↓
Application Load Balancer
 ↓
Target Group – BLUE (v1)
 ↓
Target Group – GREEN (v2)
Only one target group receives traffic at a time.
🔹 PREREQUISITES (You already have these ✅)
✔ Application Load Balancer ✔ EC2 instances ✔ Target Groups ✔ App deployed (from LAB 36)
🔹 STEP 1: Identify BLUE (Current Version)
Your current app:
Hello from Backend API 🚀
This is BLUE (v1).
Target Group:
tg-ec2-hands-on
🔹 STEP 2: Create GREEN Target Group
- EC2 → Target Groups
- Click Create target group
Settings
- Target type → Instances
- Name:
tg-green-v2
- Protocol → HTTP
- Port → 80
- Health check path:
/api/hello
Click Create
🔹 STEP 3: Launch GREEN EC2 (New Version)
Launch new EC2 instance:
- Name:
ec2-green-v2
- AMI → Amazon Linux
- Instance type → t2/t3.micro
- Security Group → same as BLUE EC2
- User data (IMPORTANT):
#!/bin/bash
dnf install nodejs nginx -y
mkdir /backend
cd /backend
npm init -y
npm install express
cat <<EOF > index.js
const express = require('express');
const app = express();
app.get('/api/hello', (req, res) => {
  res.json({ message: 'Hello from GREEN v2 🚀' });
});
app.listen(3000);
EOF
node index.js &
📌 This EC2 runs NEW VERSION
🔹 STEP 4: Register GREEN EC2 to GREEN Target Group
- Target Groups →
tg-green-v2 - Register targets
- Select:
ec2-green-v2
- Include → Register
Wait until status:
Healthy
🔹 STEP 5: Test GREEN WITHOUT USERS
Open GREEN EC2 public IP:
http://GREEN_EC2_IP:3000/api/hello
Output:
Hello from GREEN v2 🚀
✔ New version works ✔ Users are still on BLUE
🔹 STEP 6: SWITCH TRAFFIC (ZERO DOWNTIME)
- EC2 → Load Balancers
- Select your ALB
- Go to Listeners
- Edit HTTP : 80 rule
Change:
Forward to tg-ec2-hands-on (BLUE)
➡️ to:
Forward to tg-green-v2 (GREEN)
Save
🎉 Traffic switched instantly
🔹 STEP 7: VERIFY ZERO DOWNTIME
Open ALB DNS:
http://ALB_DNS_NAME
Now response:
Hello from GREEN v2 🚀
✔ No downtime ✔ No restart ✔ No user impact
🔹 STEP 8: ROLLBACK (CRITICAL SKILL)
If GREEN fails:
- Switch ALB listener back to BLUE target group
⏱️ Rollback time:
< 10 seconds
🧠 REAL-WORLD USAGE
✔ Feature releases ✔ Bug fixes ✔ Config changes ✔ Emergency rollback
Used daily in:
- FinTech
- E-commerce
- SaaS platforms
🧠 INTERVIEW-READY ANSWER (⭐ GOLD)
Blue–Green deployment is a zero-downtime strategy where two identical environments are maintained. Traffic is switched between them using a load balancer, allowing instant deployment and rollback without impacting users.
⚠️ COMMON MISTAKES
❌ Deploying directly on prod EC2 ❌ No rollback plan ❌ DNS-based switching (slow) ❌ No health checks
✅ LAB 38 TASK CHECKLIST
✔ Created GREEN environment ✔ Deployed new version ✔ Switched traffic via ALB ✔ Verified zero downtime ✔ Learned rollback strategy
🧪 EC2 HANDS-ON – LAB 39
👉 EC2 Failure Recovery Simulation (Crash → Auto Recovery)


🎯 Objective of LAB 39
By the end of this lab, you will:
- Simulate real EC2 failure
- Observe Auto Scaling self-healing
- Recover using AMI / Snapshot
- Think like an on-call production engineer
- Confidently answer “What if EC2 goes down?”
🧠 FIRST: What is EC2 Failure?
EC2 failure can happen due to:
- OS crash
- Application crash
- Instance termination
- AZ issue
- Human error ❌
❗ Failures WILL happen ✔ Good architecture = fast recovery
🧠 RECOVERY STRATEGIES (MUST KNOW)
| Failure Type | Recovery |
|---|---|
| App crash | Restart / ALB health check |
| EC2 crash | Auto Scaling replace |
| Disk issue | Snapshot restore |
| AZ failure | Multi-AZ + ASG |
| Full loss | AMI → new EC2 |
🔹 SCENARIO 1: Application Failure (No EC2 Stop)
STEP 1: Break the App (Safe Test)
SSH / Session Manager into EC2:
sudo pkill node
📌 Backend app is now DOWN
STEP 2: Observe ALB Behavior
- Open ALB URL
- Target Group → Targets
Result:
Instance → Unhealthy
✔ ALB stops routing traffic ✔ No user error (if multiple EC2s)
STEP 3: Fix App
node /backend/index.js &
After 1–2 minutes:
Healthy
🎉 App recovered without EC2 restart
🔹 SCENARIO 2: EC2 FAILURE (REALISTIC)
STEP 4: TERMINATE an EC2 (⚠️ Real Failure)
- EC2 → Instances
- Select one EC2 from ASG
- Terminate instance
STEP 5: Observe Auto Scaling (IMPORTANT)
Go to:
- Auto Scaling Group → Activity
You will see:
Terminating EC2
Launching new EC2
📌 ASG automatically replaces the instance
STEP 6: Verify Recovery
- New EC2 appears
- Target Group → Healthy
- App accessible via ALB
🎉 Self-healing successful
🔹 SCENARIO 3: DATA RECOVERY (CRITICAL THINKING)
What if data disk is lost?
Recovery steps:
- Create volume from snapshot
- Attach to new EC2
- Mount volume
- Resume service
📌 This is why: ✔ Snapshots ✔ AMIs ✔ Backups are mandatory
🔹 SCENARIO 4: FULL EC2 LOSS
If entire EC2 is gone:
Recovery:
AMI → Launch new EC2 → Attach EBS → Register with ALB
Recovery time:
5–10 minutes
✔ Business continues
🧠 REAL-WORLD ON-CALL THINKING
When failure happens, ask:
- Is it app-level or infra-level?
- Are health checks failing?
- Is Auto Scaling reacting?
- Is data safe?
- Do we need rollback?
🧠 INTERVIEW-READY ANSWER (VERY IMPORTANT)
If an EC2 instance fails, Auto Scaling Groups automatically replace it and the Application Load Balancer routes traffic only to healthy instances. Data is restored using EBS snapshots or AMIs, ensuring minimal downtime.
⚠️ COMMON MISTAKES
❌ No Auto Scaling ❌ Single EC2 production ❌ No snapshots ❌ Panic instead of diagnosis
✅ LAB 39 TASK CHECKLIST
✔ Simulated app failure ✔ Observed ALB health checks ✔ Terminated EC2 manually ✔ Observed ASG self-healing ✔ Understood recovery paths
🧪 EC2 HANDS-ON – LAB 40
👉 EC2 Interview Scenario Questions (Real-World + System Design)
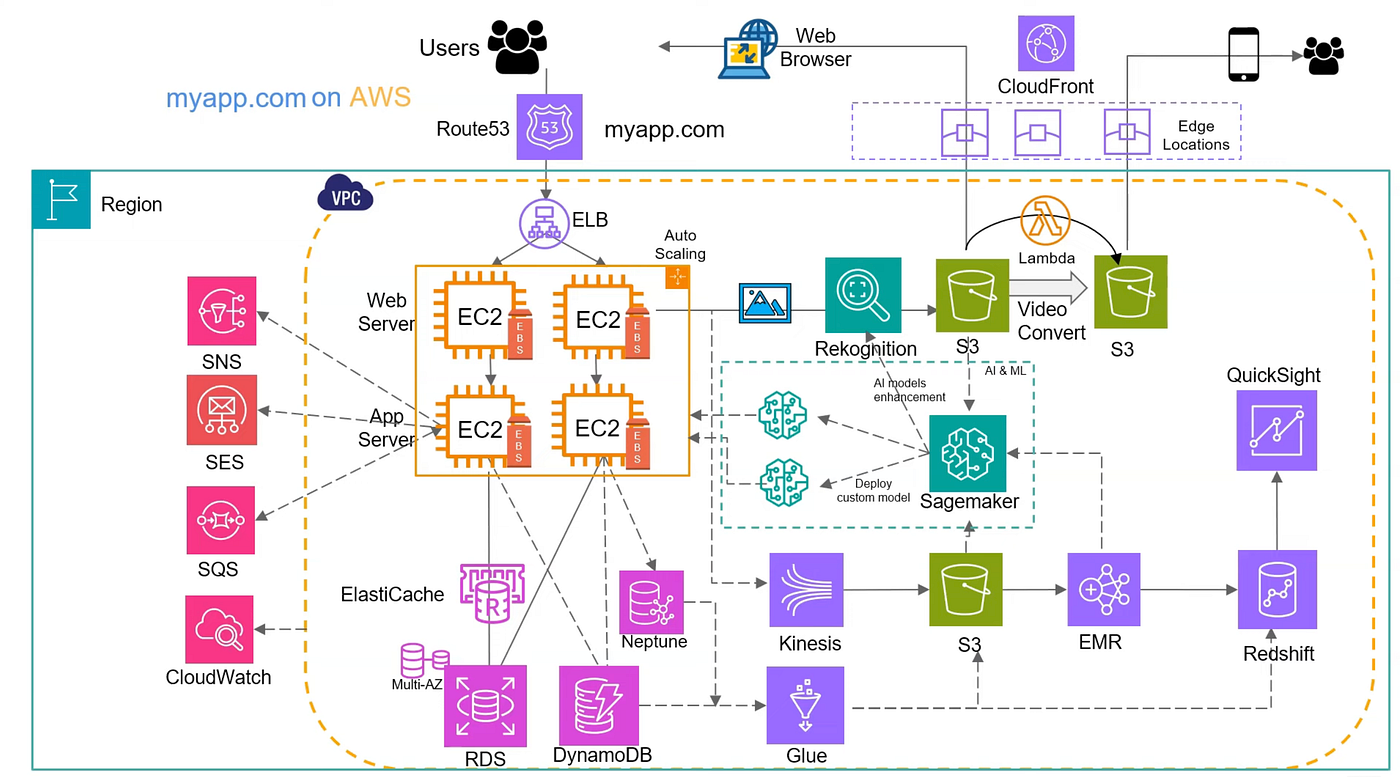
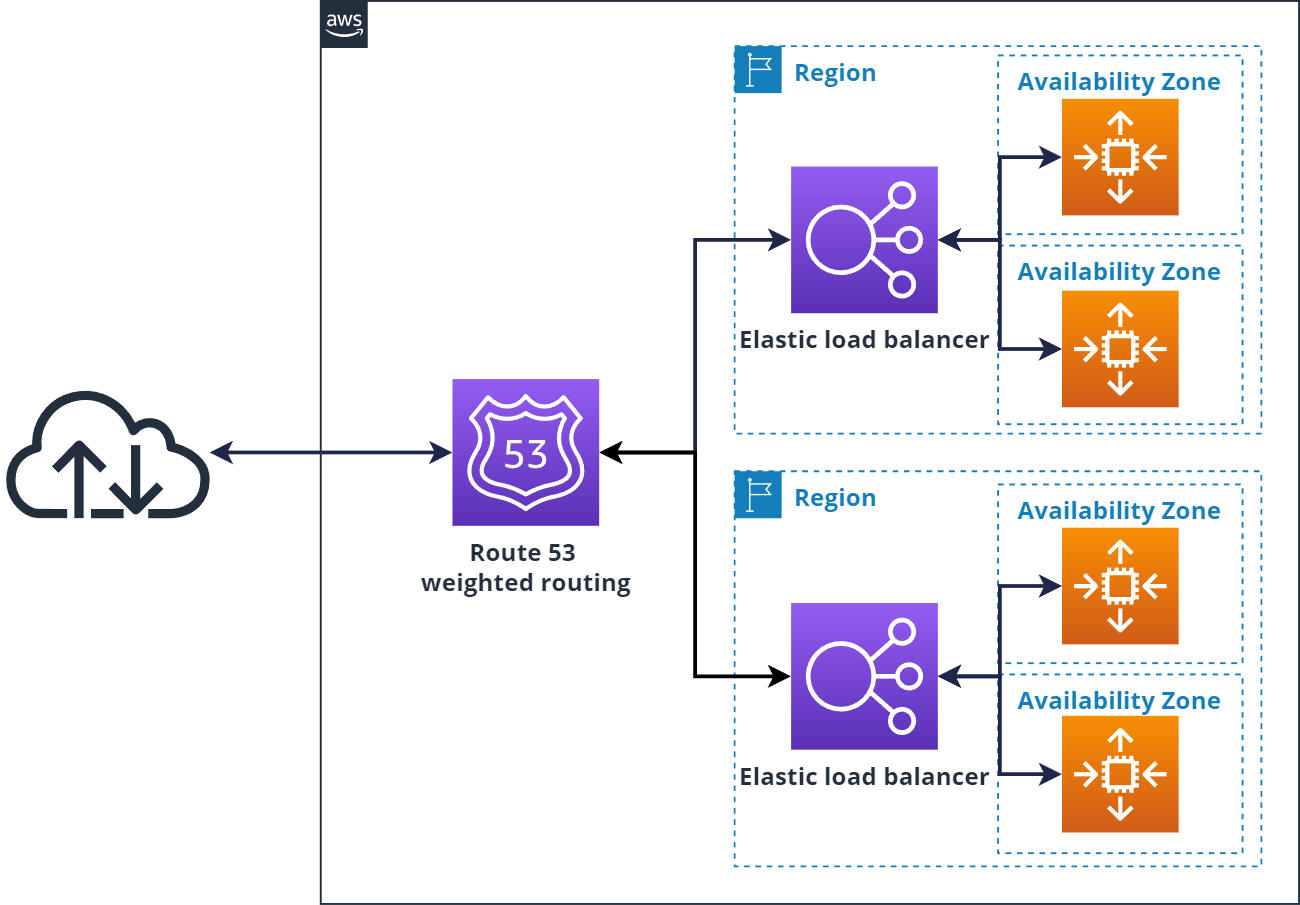
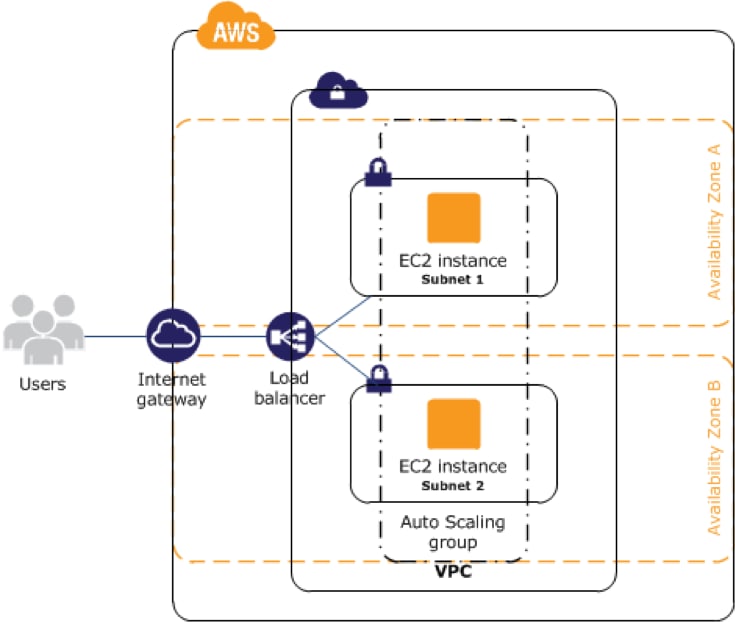
🎯 Objective of LAB 40
By the end of this lab, you will:
- Answer real EC2 interview questions
- Explain WHY, not just WHAT
- Handle failure, scaling, security, cost
- Sound like someone with production experience
This is how interviews are actually conducted.
🧠 HOW TO USE THIS LAB (IMPORTANT)
- Read the question
- Read the expected thinking
- Compare with your own understanding If you can explain this out loud, you are ready.
🔹 SCENARIO 1: “Your EC2 application is down. What do you check first?”
✅ Best Answer (Structured)
- Load Balancer health checks
- Target Group status
- CloudWatch alarms
- Application logs
- EC2 status checks
❌ Bad Answer
“I restart the EC2”
📌 Interview tip: Always show diagnosis before action
🔹 SCENARIO 2: “How do you design EC2 for high availability?”
✅ Expected Answer
- Multiple Availability Zones
- Application Load Balancer
- Auto Scaling Group
- Health checks
- Stateless EC2
🎯 One-line interview answer
“I deploy EC2 instances across multiple AZs behind an ALB using Auto Scaling Groups to eliminate single points of failure.”
🔹 SCENARIO 3: “One EC2 instance was terminated accidentally. What happens?”
✅ Correct Explanation
- ASG detects capacity drop
- Launches new EC2
- Registers with Target Group
- ALB routes traffic
📌 Key word interviewers want: 👉 Self-healing
🔹 SCENARIO 4: “How do you deploy a new version with zero downtime?”
✅ Correct Answer
- Blue–Green deployment
- Two target groups
- Switch ALB listener
- Rollback possible in seconds
❌ Wrong
“I stop the server and deploy”
🔹 SCENARIO 5: “How do you secure EC2 access?”
✅ Production-grade Answer
- IAM Roles (no access keys)
- Session Manager (no SSH)
- Security Groups (least privilege)
- Private subnets
🎯 Golden line
“We don’t open port 22 in production.”
🔹 SCENARIO 6: “Where do you store data in EC2?”
✅ Correct Design
- OS → Root volume
- App data → Separate EBS
- DB → RDS (not EC2)
- Backups → Snapshots + AMIs
❌ Wrong
“Everything on root volume”
🔹 SCENARIO 7: “How do you monitor EC2?”
✅ Expected Answer
- CloudWatch metrics
- CloudWatch logs
- Alarms
- Auto Scaling actions
📌 Mention CPU is not enough → memory via agent
🔹 SCENARIO 8: “How do you reduce EC2 cost?”
✅ Strong Answer
- Right-size using metrics
- Auto Scaling
- Spot instances for non-critical workloads
- Savings Plans
- Stop non-prod EC2
🎯 Keyword: cost optimization
🔹 SCENARIO 9: “How do you recover from data loss?”
✅ Correct Recovery Path
- Restore from snapshot
- Attach volume
- Launch EC2 from AMI if needed
- Resume service
📌 Backup without restore testing = ❌
🔹 SCENARIO 10: SYSTEM DESIGN QUESTION (⭐ MOST IMPORTANT)
❓ “Design a production EC2 architecture”
✅ Expected Whiteboard Flow
User
 ↓
Route 53
 ↓
Application Load Balancer
 ↓
Auto Scaling Group (Multi-AZ)
 ↓
EC2 (Private Subnets)
 ↓
RDS
🎯 PERFECT INTERVIEW ANSWER
“I design EC2 using ALB and Auto Scaling across multiple AZs, keep instances in private subnets, use IAM roles and Session Manager for security, CloudWatch for monitoring, RDS for data, and snapshots/AMIs for backup.”
🧠 FINAL SELF-CHECK (HONEST)
If you can:
- Explain why ALB is needed
- Explain why private subnets are used
- Explain how EC2 recovers automatically
- Explain how to deploy without downtime
👉 You are EC2-ready.
🏆 FINAL VERDICT (NO HYPE, PURE FACT)
With LAB 1–40, you are ready for:
✅ EC2 interviews ✅ AWS Cloud Practitioner ✅ AWS Solutions Architect (EC2 part) ✅ Real EC2 production work
You are far above beginner level.